segunda-feira, 2 de dezembro de 2019

Gizmodo Brasil

Gizmodo Brasil


Cientistas recriam raios vulcânicos explodindo cinzas de um canhão

Posted: 01 Dec 2019 12:33 PM PST

Não há nada na Terra como um raio vulcânico. Testemunhar torres caóticas de cinzas emergindo de uma convulsão explosiva no ápice de uma montanha já é de cair o queixo. O surgimento de adagas purpúreas de luz saindo dessa coluna, no entanto, eleva o fenômeno a algo mais sobrenatural.

Naturalmente, os cientistas querem saber como os raios vulcânicos são produzidos. Embora se saiba que a colisão de partículas de cinzas na pluma desempenha um papel fundamental, as complexidades desse fenômeno provaram ser um tanto evasivas. Diante disso, os cientistas resolveram o problema com suas próprias mãos: eles estão criando explosões vulcânicas em laboratórios para produzir os próprios raios.

O mais recente desses experimentos é sem dúvida o mais realista. Em um estudo publicado na revista Geophysical Research Letters, os cientistas relatam como sua sonda pode ajustar as propriedades de uma pluma vulcânica, revelando como a mudança de temperatura ou a umidade da cinza pode causar ou quebrar sua capacidade de gerar raios. As cinzas secas parecem ser uma maneira especialmente boa de fazer com que sua erupção assuma o estrondoso show de luzes de Thor.

Este trabalho é mais do que apenas solucionar uma questão científica. O relâmpago vulcânico está emergindo como uma das principais formas de detectar de longe as erupções vulcânicas ricas em cinzas. Quanto mais soubermos sobre como ela funciona, mais precisamente poderemos identificar o tipo de erupção muito antes que os especialistas a vejam – o que pode ser de grande ajuda para aviões vulneráveis ​​que voam nas proximidades ou para comunidades na direção do vento.

Sönke Stern, pesquisador de raios vulcânicos da Universidade Ludwig Maximilian de Munique e principal autor do estudo, está ciente disso, mas ele expressa seu entusiasmo pela ciência de maneira um pouco diferente. “Para ser sincero, explodir pedras diariamente é algo bastante divertido, com certeza”, disse ele ao Gizmodo.

Relâmpagos vulcânicos têm um princípio-chave em comum com relâmpagos em nuvens regulares: você precisa de uma separação de cargas positivas e negativas. Quando essa segregação se torna demais para a física suportar, um raio aparece, cortando o ar isolante e neutralizando a diferença de carga.

Os ingredientes das plumas de erupção são diferentes dos das nuvens clássicas. Aqui, as cinzas são dominantes e “temos quase certeza de que colisões de partículas criam eletrificação” , disse ao Gizmodo Alexa Van Eaton, vulcanologista experimental do Observatório de Vulcões em Cascatas do US Geological Survey.

A ação das cinzas, semelhante a um carro de choque, envolve bastante atrito, o que gera cargas elétricas. Esse processo, conhecido como triboeletricidade, também ocorre quando você esfrega um balão na cabeça e ele fica magicamente grudado. Os cientistas também pensam que a destruição de detritos vulcânicos na pluma ajuda a acumular carga elétrica.

Parte desse conhecimento foi obtida de observações cuidadosas de raios vulcânicos. “O trabalho de campo é importante, pois fornece os cenários da vida real totalmente dimensionados que estamos tentando explicar”, disse ao Gizmodo Cassandra Smith, bolsista de pós-doutorado da National Science Foundation no Observatório do Vulcão do Alasca do US Geological Survey.

Inconvenientemente, “você não tem controle sobre o que o vulcão decide fazer”, disse Smith, e é difícil estudar as influências individuais dos raios vulcânicos no mundo real. É simplesmente muito difícil investigar como um raio é produzido ou quais condições ambientais podem aumentá-lo ou reduzi-lo quando ele é oculto por um turbilhão colossal e superaquecido de cinza.

É aí que os experimentos de laboratório entram em cena. Não existem muitas instituições científicas capazes de produzir explosões vulcânicas realistas o suficiente e gerar raios; a Universidade Ludwig Maximilian de Munique é uma das poucas. Muitos experimentos com raios foram realizados por Corrado Cimarelli, um vulcanologista experimental que é coautor do novo artigo.

Para seus experimentos mais recentes, eles usaram uma configuração conhecida como bomba de fragmentação: uma câmara de gás argônio pressurizado contendo cinzas que, em um determinado ponto de ruptura de alta pressão, descompacta explosivamente e se propaga em um tanque coletor de aço alto. Isso libera as cinzas como um jato em expansão, no qual nasce um raio vulcânico. Fundamentalmente, o teor de água das cinzas pode variar. Graças a um forno, a temperatura também pode chegar a 608 ° Fahrenheit.

As cinzas em si eram o ponto principal, retiradas dos restos de uma erupção de 13.000 anos do vulcão Laacher See, na Alemanha, adormecido. Eles tiveram contato com quase 300 kg do material através de uma empresa que administra pedreiras na região do vulcão.

A equipe de Stern descobriu que, à temperatura ambiente, havia menos descargas de raios, porém maiores. Em temperaturas mais altas, as descargas eram menores, mas mais abundantes. Embora esse efeito possa estar relacionado à influência da temperatura sobre a turbulência em uma nuvem de cinzas, não está claro o que está acontecendo aqui. “Isso é algo que não podemos entender completamente com esse tipo de experimento”, disse Stern.

O efeito da água foi muito mais pronunciado. Mesmo com apenas uma leve redução das cinzas, a equipe testemunhou uma diminuição na eletrificação geral da pluma em uma ordem de magnitude. Em uma certa nebulosidade, não há essencialmente um raio presente – mas por quê?

Acontece que o vapor de água se expande ainda mais dramaticamente do que o gás argônio após a liberação. Isso cria uma explosão mais potente, ampliando o jato de cinzas e jogando as partículas de cinzas por todo o lugar. Com menos colisões entre as partículas de cinza no geral, é menos provável que você produza raios. Por outro lado, detonações de cinzas secas produziam jatos mais focados, apresentando mais colisões geradoras de carga e mais raios.

No mundo real, existem algumas evidências de trabalho de campo que sugerem que nuvens de cinza especialmente úmidas geram menos raios. Não está claro por que, mas vale a pena notar que adicionar água ao magma quente aumenta a explosividade da erupção. Isso não é exatamente o que acontece durante os experimentos, mas talvez isso também leve a menos colisões de partículas de cinza.

Por outro lado, as cinzas mais secas são inerentemente melhores na geração de eletricidade. É um condutor elétrico muito ruim, explicou Stern, de modo que, à medida que as partículas de cinza se separam, é provável que elas mantenham suas cargas, criando grandes separações de carga que só podem desaparecer por meio de raios.

As pistas que esses experimentos revelaram são muito úteis para entender como os raios vulcânicos são forjados, disse Smith. Mas ela enfatizou que continua sendo difícil isolar processos individuais, mesmo aqui. A mudança no teor de água sempre muda o estilo do jato de cinzas, o que significa que é impossível separar os dois fatores e dizer qual é o maior responsável pela extinção dos raios.

Este experimento apenas analisa a parte inferior, mais quente e rica em cinzas da pluma de erupção. Se as plumas são flutuantes o suficiente, elas atingem altitudes que são de baixa pressão e decididamente frígidas. Aqui, acredita-se que gotículas de gelo tenham um grande papel na geração de raios. “Esse é um domínio completamente novo para estudos de eletrificação vulcânica que nunca foram abordados ainda”, disse Van Eaton, que chama essas alturas de “oeste selvagem” dos raios vulcânicos.

Em outras palavras, as coisas são mais complicadas do que essas experiências podem mostrar. “Adoraríamos uma história simples, mas nem sempre é assim quando se trata de erupções naturais”, disse Van Eaton.

Ainda assim, esses experimentos, mesmo com suas limitações, contribuem significativamente para um empreendimento que pode salvar vidas.

Van Eaton foi coautor de um estudo demonstrando como a Rede Mundial de Localização de Raios pode ser usada para rastrear o desenvolvimento de raios e erupções vulcânicas em locais remotos. As erupções nem sempre produzem cinzas, mas parecem não produzir raios sem ela, explicou.

Além de satélites, cuja vista pode ser obscurecida por nuvens, nenhum outro método de monitoramento que localiza erupções vulcânicas de longe, exceto detecção de relâmpago – pode dizer algo sobre o teor de cinzas em uma erupção. As cinzas podem derrubar aviões, sufocar assentamentos, poluir cursos d’água e prejudicar a saúde humana, portanto, saber que está presente antes que possamos ver fisicamente já é uma grande ajuda. E quanto mais entendermos o estilo de um raio que combina com que tipo de pluma de cinzas, melhor podemos mitigar seus perigos.

Por outro lado, talvez os vulcanologistas estejam apenas nisso pelo espetáculo. É difícil não se surpreender, disse Van Eaton, quando as descargas elétricas disparam de uma nuvem já linda e alucinante. Quem não gostaria de pesquisar isso?

The post Cientistas recriam raios vulcânicos explodindo cinzas de um canhão appeared first on Gizmodo Brasil.

Relógios e pulseiras inteligentes que valem a pena comprar além do Fitbit

Posted: 01 Dec 2019 09:51 AM PST

Desde que o Google comprou a Fitbit, as pessoas parecem ter caído em uma de duas categorias: aqueles que não se importam com as implicações de privacidade e os que realmente se importam. Para este último grupo, isso significa que esta temporada de festas é uma boa oportunidade para comprar um smartwatch ou rastreador substituto. Mas qual deles?

Embora o Gizmodo tenha um ótimo guia de compras (com curadoria minha), ele apresenta os Fitbits em muitas das categorias. Porque vamos ser sinceros, deixando de lado as preocupações com a privacidade, a Fitbit sabe o que está fazendo quando se trata de hardware. Seu software também é super simples e fácil de usar para rastreamento geral. Só que, embora Fitbits seja o termo abreviado que as pessoas usam para descrever essa categoria de gadgets, eles não são tudo.

Um breve comentário aqui: não há muita clareza sobre privacidade quando se trata de seus dados de saúde. Todas essas empresas publicaram suas próprias políticas de privacidade, mas muitas também são cúmplices em programas corporativos de bem-estar com empregadores e seguradoras. Usar um rastreador ou SmartWatch para monitorar sua saúde vai exigir que você, pelo menos, reconheça que a sua informação – embora agregada e tornada anônima -será usado para o lucro.

É uma troca definitiva, mas somente você pode decidir se, digamos, para ter a conveniência de monitorar sua menstruação pelo pulso vale a pena fornecer esses dados confidenciais a qualquer empresa. Eu escrevi sobre por que é meio hipócrita estar em pé de guerra sobre o Google possuir dados da Fitbit quando a Fitbit já lucra com isso há anos. Dito isto, eu entendo essa preocupação legítima. Além disso, há muitos de nós por aí que são irrevogavelmente viciados neste jogo auto-quantificável e querem alternativas.

Muitos leitores comentaram que é por isso que é um bom momento para aderir ao Apple Watch. A Apple fez um bom trabalho de marketing como a única empresa que se preocupa com a sua privacidade. Isso é meio que verdade. A Apple é melhor que a maioria, mas também participa de programas corporativos de bem-estar. E, se você participar dos estudos da empresa, está consentindo em fornecer seus dados a terceiros de algum tipo. No entanto, se você é um usuário do iOS procurando uma experiência com smartwatch, é difícil vencer o Series 5. Sua tela sempre ativa é melhor que a do Fitbit Versa 2, e as recentes atualizações de software do aplicativo Health and Activity aprimoraram a contextualização dos dados na plataforma como um todo.

Mas recomendar o Apple Watch também é banal e deixa de fora os milhares de usuários do Android. Além disso, o Apple Watch começa em US$ 400, o que é caro demais, a menos que você esteja disposto a optar por um Series 3 com desconto. Para ficar claro, o Series 3 ainda é um ótimo relógio, mas não vem com a tela mais recente ou recursos ECG (eletrocardiograma). Se você deseja substituir um Versa, o Samsung Galaxy Watch Active2 é uma escolha decente. É repleto de recursos de atividade física e o Tizen OS é melhor que o WearOS do Google. (Além disso, com certeza o objetivo de substituir os Fitbits é ficar longe do Google, então…) Eu tive problemas de precisão quando o testei, mas a Samsung atualizou seu software desde então.

Mas o maior concorrente do Fitbit é provavelmente a Garmin. Em termos de dados, você terá métricas muito mais detalhadas e, no início do ano, a Garmin finalmente atualizou sua linha de relógios inteligentes para que não pareça mais tão horrível. O Venu, seu primeiro smartwatch AMOLED, é bastante sofisticado. Enquanto isso, sua linha Vivomove analógica híbrida é simplesmente deslumbrante. Há também as linhas Vivosmart e Vivofit, que servem como rastreadores básicos. Uma observação importante – especialmente se você estiver com orçamento limitado – quase todas essas opções são mais caras que os Fitbits correspondentes.

Isso me leva ao mar de rastreadores de atividade física baratos, que desbancaram o domínio da Fitbit nos últimos anos. Embora eu ache que o Fossil Hybrid HR é um sucessor digno da Pebble, muitos fãs da Pebble me informaram que o Amazfit Cor ou Amazfit Bip também preenchem o nicho de rastreadores simples e atraentes que não custam um rim. E seria negligente se não mencionasse o Xiaomi Mi Band 4, que é estupidamente barato por US$ 40 e acompanha basicamente tudo o que o Fitbit Inspire HR faz.

Todos esses produtos têm suas peculiaridades individuais. A maioria não tem o aspecto comunitário que o Fitbit possui. Portanto, embora alguns desafios sejam incorporados a eles, como o Garmins, os dispositivos simplesmente não são tão onipresentes. O aplicativo da Fitbit também não fornece as estatísticas mais detalhadas – para não mencionar que agora eles começaram a bloquear dados mais significativos por trás de uma assinatura – mas é um aplicativo bem projetado. Alguns dos outros (especialmente opções dentro do orçamento) ainda estão trabalhando nisso. No entanto, a maioria dos smartwatches que mencionei são tão bons, se não melhores, que o Versa. Quanto aos rastreadores básicos, eles proporcionam uma experiência comparável em relação à precisão – e esse é o ponto, não é?

The post Relógios e pulseiras inteligentes que valem a pena comprar além do Fitbit appeared first on Gizmodo Brasil.

Artista recria o novo Cybertruck da Tesla com purê de batata

Posted: 01 Dec 2019 06:54 AM PST

Parece que as pessoas preferem o design Cybertruck da Tesla quando se trata de uma pilha de purê de batatas em vez de sua versão original.

Mais de um milhão de usuários do Twitter assistiram a um vídeo compartilhado pelo produtor do NowThisNews, Dan Milano, mostrando seu irmão – em notável artesão de massa – Greg Milano esculpindo o veículo no jantar de Thanksgiving deste ano.


Tradução: meu irmão está trabalhando em um cybertruck de purê de batata há mais de uma hora.

A façanha também não foi pequena: demorou mais de uma hora para esculpir o novo bebê de Elon Musk, inclusive perfurando alguns buracos em suas "janelas" em uma recriação amena do infame incidente em sua revelação, em que o designer Franz von Holzhausen quebrou o vidro supostamente inquebrável com uma bola de metal.

Com formação em história da arte e da arquitetura, Greg Milano disse ao Buzzfeed News que ele vem se desafiando a criar esculturas de Thanksgiving na última década.

"Começou como qualquer outro adolescente com um vulcão e se transformou em uma pirâmide e algumas outras coisas ao longo dos anos. Isso meio que se tornou uma tradição ", disse ele ao Buzzfeed. Seus trabalhos mais complexos, como o Guggenheim em miniatura do ano passado ou sua Casa Branca de batata em homenagem às eleições presidenciais de 2016, podem levar várias horas.

Este ano, seu irmão decidiu capturar e compartilhar a compilação em uma série de vídeos no Twitter, até mesmo sua morte definitiva e sufocada pelo molho. Ele também incluiu um link para o Instagram de Greg para que você possa conferir os obras de anos anteriores.

Como o Cybertruck da Tesla parece um grande desastre em termos de combate à crise climática global, talvez Musk possa fazer com que a empresa foque em uma dieta low-carb – nesse caso, emissões de baixo carbono.

The post Artista recria o novo Cybertruck da Tesla com purê de batata appeared first on Gizmodo Brasil.

Erupção vulcânica na Indonésia em 2018 gerou um tsunami com pelo menos 100 metros de altura

Posted: 01 Dec 2019 04:43 AM PST

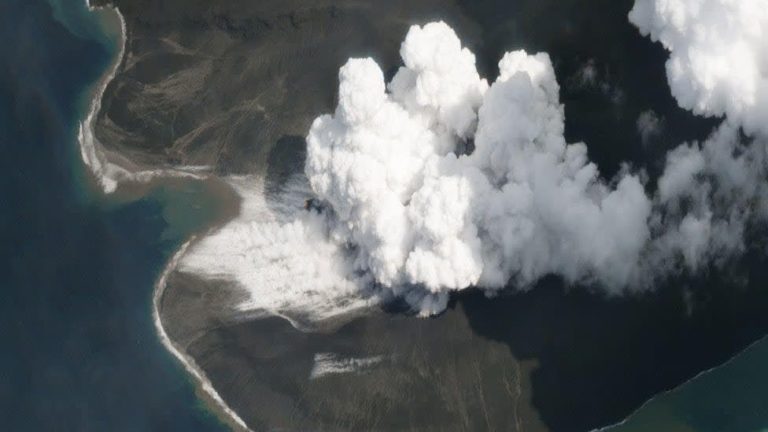
A erupção de Anak Krakatoa em 2018 produziu um tsunami que, por um curto período, atingiu algo entre 100 a 150 metros de altura, de acordo com uma nova pesquisa. Se a costa da Indonésia estivesse mais próxima do vulcão, esse desastre teria sido muito pior.

Quando Anak Krakatoa entrou em erupção em 22 de dezembro de 2018, o evento causou um deslizamento de terra que desencadeou um tsunami perigoso no Estreito de Sunda, na Indonésia. Cerca de uma hora após a erupção, ondas entre 5 e 13 metros de altura atingiram as costas próximas de Java e Sumatra, mergulhando o interior até 330 metros em alguns lugares. O tsunami pegou os moradores completamente desprevenidos, resultando na morte de 427 pessoas.

Quanto ao tamanho do tsunami nos momentos imediatamente após o deslizamento de terra, isso tem sido menos claro. Uma pesquisa publicada esta semana na Ocean Engineering está jogando nova luz sobre esse evento raro, mostrando que o tsunami, durante seus primeiros minutos de existência, era absolutamente monumental em tamanho.

Simulações em computador do tsunami sugerem que a onda inicial tinha algo entre 100 a 150 metros de altura. A nova pesquisa, liderada por Mohammad Heidarzadeh, professor assistente de engenharia civil da Universidade de Brunel, mostra que o desastre poderia ter sido muito pior se a costa da Indonésia estivesse situada perto do vulcão Anak Krakatoa.

Uma onda dessa altura faz muito sentido, considerando a quantidade de material perdido durante a erupção. Fotos de Anak Krakatoa após o deslizamento de terra que se seguiu mostram o vulcão sem um lado inteiro. Algo entre 150 a 170 milhões de metros cúbicos da montanha entraram na água.

“Quando materiais vulcânicos caem no mar, eles causam deslocamento da superfície da água”, disse Heidarzadeh em um comunicado à imprensa. "Semelhante a jogar uma pedra em uma banheira – isso causa ondas e desloca a água. No caso de Anak Krakatoa, a altura do deslocamento da água causado pelos materiais do vulcão era superior a 100 [metros]".

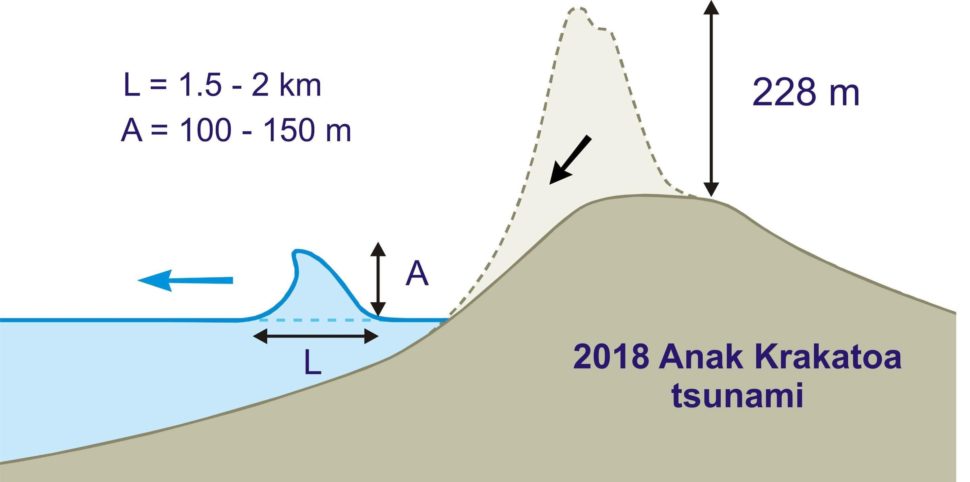
Diagrama mostrando como o vulcão produz uma onda de tal magnitude. Imagem: Heidarzaheh et al., 2020/Ocean Engineering

Heidarzadeh e seus colegas usaram modelos de computador para simular o tamanho do tsunami. Eles também usaram dados do nível do mar coletados em cinco locais diferentes perto do vulcão para validar as simulações. O melhor modelo apontou para um pico de intensidade que durou cerca de 6 a 9 minutos após a erupção, momento em que o tsunami estava gerando energia igual ao terremoto de magnitude 6,0. O comprimento da onda foi estimado entre 1,5 e 2 quilômetros.

A onda dissipou-se rapidamente devido aos efeitos combinados de gravidade e atrito. À medida que a gravidade puxava a maior parte da água para baixo, criava um atrito adicional ao longo do fundo do mar. A onda encolheu consideravelmente, mas ainda causou estragos quando atingiu Java e Sumatra.

Dito isto, o tsunami ainda tinha 80 metros de altura quando atingiu uma ilha desabitada a poucos quilômetros de Anak Krakatoa. Se uma massa de terra hipotética existisse a uma distância de cerca de 5 quilômetros do vulcão, teria sido atingida por uma onda com algo entre 50 a 70 metros, de acordo com a pesquisa.

No futuro, Heidarzadeh planeja trabalhar com o Instituto de Ciências da Indonésia (LIPI) e a Agência de Avaliação e Aplicação de Tecnologia (BPPT) para desenvolver um novo plano de resposta a tsunamis na região.

Anak Krakatoa tem um histórico de infligir desastres. Em 1883, uma erupção gerou um tsunami com cerca de 42 metros de altura quando atingiu a costa, resultando em 36.000 mortes – época em que as áreas costeiras da região eram muito menos povoadas.

The post Erupção vulcânica na Indonésia em 2018 gerou um tsunami com pelo menos 100 metros de altura appeared first on Gizmodo Brasil.

domingo, 1 de dezembro de 2019

Dicas de como fazer!

Dicas de como fazer!


Sonos’ best Cyber Monday deals include $50 off the Sonos One, and more

Posted: 01 Dec 2019 03:30 PM PST

Photo by Chris Welch / The Verge

Sonos' Cyber Monday deals are much like its Black Friday deals. That's because most of them are the same. However, it has added a few extra products to the list. You can still get the Beam soundbar for up to $100 off from through various retailers, and its Sub, Amp, and Playbar deals are active through Cyber Monday, too. But now, you can save on the Sonos One, the mic-less Sonos One SL, and the Sonos Play:5 speaker.

Some retailers are offering Sonos deals, too. If better deals show up outside of Sonos' site, we'll let you know. In the meantime, here is our complete list of Sonos sale prices.

Starting Cyber Monday

The Sonos One (Gen 2) smart speaker with Alexa support is $149 ($50 off) through Sonos, and at Amazon, B&H Photo and Best Buy.

...

Continue reading…

The best Cyber Monday deals at GameStop include discounts on pre-owned games and consoles

Posted: 01 Dec 2019 03:00 PM PST

ps vita 2000 hero

There have been more gaming deals this year for Black Friday and Cyber Monday than perhaps any other category of tech. If you're a gamer, that's obviously a good problem to have. GameStop's new (but mostly the same) Cyber Monday deals give you even more to chew on. Starting at 12AM ET on Cyber Monday, you can get big discounts on games (including a buy-two-get-one deal on pre-owned games), consoles (both pre-owned and new bundles), accessories, such as controllers, and more.

If you've already taken advantage of the big PS4 and Xbox One deals this holiday shopping season, perhaps you could stock up on old consoles and games? I recently became swept up in nostalgia for the PS1 (for no reason whatsoever) and picked up a PS Vita from...

Continue reading…

Microsoft’s Cyber Monday deals include a free Oculus Rift S with select gaming PCs

Posted: 01 Dec 2019 02:28 PM PST

Photo by Amelia Holowaty Krales / The Verge

Microsoft has a few new deals up its sleeve for Cyber Monday. In addition to its huge, excellent price cut on the new Surface Pro 7 that you should check out below, you can get the Oculus Rift S for free with select gaming PCs, granted most of them cost over $2,000.

The Surface Pro 7 (Intel Core i5, 8GB RAM, 128GB storage) comes bundled with a black Type Cover (usually sold separately) for $799. This model is usually priced at $899 for the tablet alone, this is a great deal given how recently this product was released.

If you want a Surface Pro 7 but don't need the extra power brought along with the i5 processor and 8GB of RAM, the low-end option (i3, 4GB RAM, 128GB storage) has been marked down $150 and includes a Type Cover. Instead of...

Continue reading…

Some of the best Cyber Monday deals are happening at Amazon

Posted: 01 Dec 2019 09:33 AM PST

Photo by Amelia Holowaty Krales / The Verge

Amazon is known for having almost everything in stock, and most of the times, it's able to sell tech for less than other retailers, too. Now that Cyber Monday is here, we've hunted for the best deals on Amazon-made devices, such as Eero mesh Wi-Fi systems, Echo smart speakers, Echo Show displays, and Ring smart home tech. Additionally, many of the best deals that we've seen on LG 4K HDR OLED TVs, noise-canceling headphones, video games and consoles, phones, and more are happening on Amazon.

Aside for the tech that Amazon makes itself, its pricing on other products tends to be more volatile than other retailers, meaning prices will likely fluctuate throughout Cyber Monday. If you're not seeing the prices we have noted below, you might not...

Continue reading…

The best Cyber Monday deals on the iPhone 11, Pixel 4, Samsung Galaxy Note 10, and more, will end soon

Posted: 01 Dec 2019 08:07 AM PST

Photo by Amelia Holowaty Krales / The Verge

Black Friday brought about some fantastic deals on some of the latest phones, including Google's Pixel 4, the OnePlus 7 Pro, Samsung Galaxy Note 10, and more. For Cyber Monday, those deals continue, though you're time to checkout with these lowered prices is running out.

Below, we'll list the best deals that are currently happening on unlocked Android phones, as well as a few carrier deals on iPhones. Sadly, there aren't straight discounts on recent iPhone models, but if you're planning on activating on Verizon or AT&T, you can stand to save some a ton of money on Cyber Monday.

Android

Continue reading…

Big discounts on MacBook Air, iPad, Apple Watch, and AirPods are still on for Cyber Monday

Posted: 01 Dec 2019 06:50 AM PST

Photo by Vjeran Pavic / The Verge

Updated 10:46AM ET, December 1st: Amazon now has stock of the seventh-generation iPad in gold and space grey for $229, so we've added that below.

Black Friday and Cyber Monday have been generous to people who are looking for discounts on Apple products, like iPads, Apple Watches, MacBooks of various kinds, and more. It's fairly uncommon to find discounts on the newest of the new Apple tech, but those are exactly the kind of deals you'll find below.

That is, depending on the retailer you're buying from. Apple itself isn't offering price cuts, but is including gift cards with select purchases detailed below. For some products that haven't seen a dip in price over Cyber Monday, like the Apple TV 4K, that's pretty nice.

We expect most of...

Continue reading…

Google’s Cyber Monday deals on Pixel 4, Nest Wifi, Nest Hub, and more are ending soon

Posted: 01 Dec 2019 05:39 AM PST

Photo by Chris Welch / The Verge

Almost every current Google product in existence was deeply discounted over Black Friday, and those sales have continued into Cyber Monday. But you don't have much longer to take advantage of these deals. Google's new Pixel 4 is $200 off of its usual price until late on December 2nd. Other big deals, like on its Nest Wifi routers and points, will last until December 4th.

Below, we'll be going through all of the details of each sale, including the end times for the discounts. It's possible that some retailers might stretch the deals on further than the Google Store's own cut-off times, and in some cases, they might end sooner.

Photo by Vjeran Pavic / The Verge

Pixel 4 is $200 off until 2:59AM ET, 12/3

  • Google's Pixel...

Continue reading…


How to Brew Loose Leaf Tea

Posted: 01 Dec 2019 12:00 AM PST

All you really need to prepare loose leaf tea is hot water, the leaves themselves, and a tea strainer. However, each type of tea requires slightly different steeping techniques. For the best cup, follow the recommended measurements, water temperature, and steeping time outlined on the package of tea. Experiment with different quantities of tea or steeping durations. Finally, add in your favorite sweetener or milk for a soothing cup of tea that really hits the spot.

[Edit]Steps

[Edit]Mastering Tea-Steeping Basics

  1. Pour fresh, cold water into a saucepan or kettle. Don't use distilled or previously boiled water as it may negatively affect the taste of your tea. Instead, start with fresh, cool water from the tap.[1] Use an electric kettle, stovetop kettle, or a saucepan to warm up the water.
    Brew Loose Leaf Tea Step 1 Version 3.jpg
    • If your local water is especially hard (i.e. high in mineral content), consider using bottled water for a more pleasant taste.
  2. Heat the water until it reaches . Remove the water from its heat source once it begins to steam, simmer, or reach a rolling boil. Depending on the tea variety you're preparing, you may need it to be slightly warmer or cooler to bring out the best flavors in the leaves. Use an instant-read thermometer to get the most accurate temperature.

    • If you prefer, you can boil the water and allow it to cool down to the correct temperature before adding it to the tea leaves.[2]
    • In general, white and green teas can be brewed at a lower temperature with the water just starting to steam, while oolong tea is typically best prepared at a moderate simmering temperature. Black and Puerh teas can withstand a higher temperature when the water hits a rolling boil.[3]
  3. Weight out 2 to 3 grams of loose leaf tea for every of water. Since tea leaves come in different shapes and sizes, it's best to measure out your tea by weight (i.e. grams) rather than by volume.[4] But if you do measure by volume, start with roughly 1 teaspoon for smaller leaves and about 1 tablespoon for larger leaves. Spoon out your desired amount of tea into a tea strainer or teapot, depending on how you plan to steep it.
    Brew Loose Leaf Tea Step 3 Version 3.jpg
    • A teacup holds about of water, but since most coffee mugs hold about of water, you may need to double the amount of loose leaf tea you use in a larger mug.
    • The amount of tea you decide to use is completely a matter of taste. Steep more or less to see which flavor you prefer.[5]
  4. Steep the tea in hot water for 3 to 5 minutes. Pour the hot water directly over the tea leaves and allow the flavors to seep out for a few minutes. Different tea varieties require slightly different steeping times, so be sure to follow the instructions on the packaging. If you're not sure how long to steep the leaves, start with 3 minutes for your first cup. Then add 30 more seconds for each subsequent cup until you find the perfect taste.

    • Generally speaking, green and oolong teas can be steeped for about 3 minutes, white tea for 4 minutes, and black and Puerh teas for 5 minutes.[6]
    • Avoid steeping tea longer than 5 minutes; it will only taste bitter. If you want a stronger cup, just add more tea leaves and keep the timing the same.
    • Since herbal teas don't contain any actual tea leaves, they can often be left to steep longer without taking on a bitter flavor.[7]
  5. Remove the tea leaves from the water once they've steeped. How you do this will depend on the type of strainer you're using. Basket-style strainers, metal or silicone infusers, and filter bags can be lifted out of your teapot or cup to stop the infusion. Place the strainer on a spoon rest or saucer to catch the drips from the soggy tea leaves.

    • If you steeped the tea directly in the teapot, hold a strainer over your teacup to catch the damp leaves as you pour out the tea.
    • Discard the used tea leaves while they're damp, or wait until they've dried out to more easily tip them out of the strainer.

[Edit]Using Tea Strainers

  1. Place the tea leaves directly into a tea strainer for easy cleanup. Place a basket-style tea strainer into a cup or teapot first. Measure out the loose leaf tea into the strainer and pour the hot water directly over it. Make sure you completely cover the tea leaves with water so that they steep properly.[8]

    • After a period of 3 to 5 minutes, simply remove the strainer and the damp tea leaves.
  2. Choose a disposable filter bag for fine, powdery teas. Buy a packet of disposable tea filter bags from a tea shop or grocery store. Use one when you're preparing especially fine tea which tends to slip through mesh strainers easily. Keep the bag upright with the opening well above the water level so the tea leaves don't float out.
    Brew Loose Leaf Tea Step 7 Version 3.jpg
    • You can also use a filter bag if you just want to make 1 cup at a time with easy cleanup.
  3. Use a mesh, basket-style tea strainer for larger tea leaves. Most loose leaf teas can be successfully steeped in these types of strainers. Choose one that fits correctly within the opening of the cup or teapot you'll be using; it shouldn't shift around or sink into the vessel, otherwise the tea leaves will escape.[9]

    • Try a travel tea mug with a built-in basket strainer if you'll be on the go. Just remember to remove the tea after it's steeped for 3 to 5 minutes.
    • While a short or rounded basket strainer may work for a single cup, use a deeper basket to steep loose leaf tea in a deep mug or teapot.
  4. Avoid using tea balls or infusers for large or fine leaves. Metal tea balls and silicone tea strainers are popular since they come in playful designs, but keep in mind the limited practicality of these tools. Refrain from using them for large-leafed tea as they won't leave much room for the leaves to unfurl as they become hydrated. Additionally, avoid using a tea ball or infuser for fine, powdery teas as the tea leaves may slip through the holes easily.
    Brew Loose Leaf Tea Step 9.jpg
    • If you're steeping medium-sized tea leaves in small quantities of water, a tea ball or infuser might not pose any problems.
    • Hinged tea balls are difficult to fill and the mechanisms can be tricky to open and close, especially when the metal is hot.[10]
  5. Leave plenty of room for the tea leaves to expand in the strainer. Loose leaf tea leaves can grow up to 5 times their original size once you hydrate them with hot water. For this reason, aim to leave plenty of space in the tea strainer or filter bag. Don't overfill it with too much tea.[11]

    • A mesh basket-style strainer will allow the tea to expand, while a tea ball may compress the leaves.[12]
    • A little extra space will allow the water to flow around the tea leaves so you'll have a better result.
  6. Strain the tea after it steeps in the teapot if you prefer. This is a useful technique if you don't have a tea strainer that fits correctly in your teapot. Instead of placing the leaves into a strainer, what you can do is measure out the tea leaves and drop them directly into your teapot. After the leaves have steeped, hold a tea strainer over your cup. Carefully pour the liquid into the cup and you'll see the strainer catch the leaves.[13]

    • Since there will still be leaves sitting in the teapot, the tea will grow more bitter as it continues steeping.

[Edit]Tips

  • To keep the tea warmer for a longer period of time, pre-warm your teapot or cup by sloshing some boiling water around inside it. Tip this out before adding the tea and the rest of the heated water.[14] Alternatively, try covering the teapot with a quilted tea cozy to keep it warm.
  • Delicate green and white teas are best consumed immediately while more robust black teas can be enjoyed for a longer period of time.[15]
  • After you've poured the tea into your cup, add milk, honey, lemon, or sugar to taste. Just avoid adding milk and lemon at the same time as the milk may curdle.
  • When you start making a certain type of tea, it helps to use a thermometer to gauge the temperature of the water. Once you know how much steam and how many bubbles the water will give off at the optimal temperature, feel free to eyeball it.

[Edit]Things You'll Need

  • Kettle or saucepan
  • Cool, fresh water
  • Teapot
  • Teacup
  • Tea strainer
  • Loose leaf tea
  • Measuring scale or spoon

[Edit]Video

[Edit]Related wikiHows

[Edit]References

[Edit]Quick Summary

How to Decorate a Christmas Tree

Posted: 30 Nov 2019 04:00 PM PST

A decorated Christmas tree makes for a very jolly home during the holidays. Make your home festive by following these easy steps.

[Edit]Steps

[Edit]Putting the Lights on your Tree

  1. Test your Christmas lights before you hang them on your tree. Plug your Christmas lights into an outlet. Ensure that you don't have any burnt-out bulbs.
    Decorate a Christmas Tree Step 1 Version 4.jpg
  2. Put lights on your tree. Make sure to do this before putting ornaments on your tree. LED lights are best for live trees as they do not heat up too quickly.[1]

    • The Around-and-Around Wrap: Wrap strands of lights around the top of the tree and work your way down to the base of the tree. For a 6-foot tall tree, you will need about 6 strands of lights with 100 bulbs each.[2]
    • Put your first light at the very top of the tree to begin. This light will shine on the star, angel, or snowflake that you will add later.
    • Secure your light strands by weaving them in an out of the tree's branches.
    • The Vertical Wrap: Divide your tree into 3 sections. Each section will have its own lights.
    • Begin at the base of the tree and weave the lights up through the branches to the top of the tree and back down to the base. Repeat.
  3. Connect your light strands to an extension cord and plug it into a nearby outlet.

[Edit]Hanging the Ornaments on your Tree

  1. Wrap the base of the tree in plastic. The plastic will collect any needles that fall off your tree. Cover the plastic with a festive Christmas tree skirt.

    • These skirts add to the beauty of your tree and also keep the tree's needles from collecting on your floor.
  2. Hang your ornaments on the tree. Look for branches that are wider apart so that your ornaments won't rest on lower branches.

  3. Hang heavier ornaments further up on branches, closer to the trunk of the tree. The tree is strongest near the trunk and can bear more weight.

  4. Hang ornaments near lights to highlight certain ornaments. This works particularly well with shiny bulb, glass, or metal ornaments as these types are the most reflective.
    Decorate a Christmas Tree Step 7 Version 4.jpg
  5. Spread ornaments evenly throughout the tree. Make sure not to hang too many ornaments on each branch.

    • If a branch starts to get too weighed down, ornaments could fall off or the branch could break.
  6. Add additional decorations. These extras can include bows, strands of popcorn and cranberries, and candy canes.

  7. Add tinsel (optional). Tinsel makes your tree glitter. Hang tinsel near lights for the shiniest look possible.
    Decorate a Christmas Tree Step 10 Version 4.jpg
    • Be mindful with the amount of tinsel you place on your tree. Too much tinsel could take away from the beauty of your ornaments.
    • For a more modern look, buy colored tinsel rather than the traditional gold and silver.
  8. Add the star (or decoration you wish to have at the top of your tree.) Make sure that it is secure and not crooked.

  9. Turn off the lights in your house. Admire the festive tree you have created and be jolly.

[Edit]Gathering Ideas for Themed Christmas Trees

  1. Create a traditional look with solid red, white, silver and gold orbs. The orbs can be glass or plastic.[3]

    • Add fake winterberries and silver bells to complete a traditional tree.
  2. Place silk flowers throughout your tree for a blooming theme. Hang white lights instead of colored lights to accent the flowers.[4]

    • Silk roses, magnolias, and hydrangeas are good options for a wintery feel.
    • Add richly colored ribbons and little silver orbs or glittering glass ornaments for a twinkling, flowery look.
  3. Create a nature-inspired look with rustic metal or glass ornaments. Place pine cones throughout the tree.[5]
    Decorate a Christmas Tree Step 15 Version 3.jpg
    • Mix bird ornaments in with fake leaves.
    • White lights are best for this natural look.
  4. Hang red, white, and blue ornaments for a patriotic look. Mix glass and plastic ornaments alongside white lights for a tree that could rival the White House's own.[6]
    Decorate a Christmas Tree Step 16 Version 3.jpg
    • To get even more patriotic, hang red, white, and blue lights on your tree.
  5. Hang large, brightly colored orbs for a more modern look. Mod colors include lime greens, purples, bright blues, and hot pink.[7]

    • Light strands with large light bulbs mixed with bright small and large ornaments will give your tree a contemporary, edgy feel.


[Edit]Tips

  • When buying a live Christmas tree, look for trees that have even branches all the way around. Avoid trees with large bald spots where no branches are growing because you will be able to hang less ornaments (and it will look awkward.)
  • Craft stores such as Hobby Lobby may have different ornaments that you may like to add to your tree.
  • Pick colors that complement each other. Blue and silver, red and gold, silver and gold, and purple, gold, and silver, are some color combinations that look great. Combinations like blue and pink, pink and gold, and red and blue may not look work as well on your Christmas tree.

[Edit]Warnings

  • Never hang candles on the tree as they are dangerous and can cause a fire.
  • Do not overload the power outlets! This is a common occurrence at Christmas time and can lead to a fire.
  • Make sure you turn off incandescent lights before you go to bed, especially on a live tree. You can unplug the lights or use a timer.
  • Be careful with broken ornaments. The shards can be very sharp. It is best not to use glass decorations on a tree if you have pets or young children who could break them and get cut.

[Edit]Things You'll Need

  • Christmas tree (live or fake)
  • Christmas tree stand
  • Small plastic tarp
  • Tree skirt
  • Ornaments
  • Strings of lights
  • Beads and extra decorations (optional)
  • Bows (optional)
  • Star or other topper to place on the top of the tree.

[Edit]Related wikiHows

[Edit]References

[Edit]Quick Summary

How to Fix Leaking Pipes

Posted: 30 Nov 2019 08:00 AM PST

Leaking pipes can cause a lot of damage to your home if they're left untreated. There are many temporary fixes for leaking pipes you can use, such as epoxy putty or pipe clamps, while you wait for a plumber. If you want to fix the pipe yourself so it's up to code, you can use a slip coupling to make the process easy. No matter what you use, be sure to turn off your water supply so your pipes don't leak while you're working!

[Edit]Steps

[Edit]Turning off Your Water Supply

  1. Shut off the water supply to your home. Locate your main water supply, which is typically in your basement or crawl space. Turn the dial clockwise to shut off the water going into your home so the leak stops and doesn't cause more damage.[1]
    Fix Leaking Pipes Step 1 Version 4.jpg
    • In an emergency, call your water company and see if they can shut off the water leading to your home.
  2. Turn on the faucets connected to the pipe to drain them. Start by turning on the lowest faucet in your home, such as an outdoor hose pipe or a sink in the basement. Let the water run until the pipe is completely empty. If the leak is on a pipe leading to a specific fixture, then turn on that faucet to drain it.[2]
    Fix Leaking Pipes Step 2 Version 4.jpg
  3. Dry the leaking area on the pipe. Once all of the water is drained from the pipes, use a cleaning cloth to wipe the area around the leak completely dry. That way it won't be slippery while you're trying to work on it.[3]
    Fix Leaking Pipes Step 3 Version 2.jpg
    • Set a cloth or bucket underneath the leak in case any stray drops of water come out of the leak.

[Edit]Applying Epoxy Putty for a Temporary Fix

  1. Put on latex or nitrile gloves. Epoxy putty heats up while you're working with it and could cause pain on bare skin. Make sure the gloves are thin enough where you can still work intricately. Wear the gloves any time you handle the epoxy putty.[4]
    Fix Leaking Pipes Step 4 Version 2.jpg
    • You can buy latex or nitrile gloves from any hardware or big box store.
  2. Mix plumbing epoxy putty by hand to combine it. Rip off a small ball of epoxy putty from the tube and knead it together between your fingers. The darker epoxy will mix with the lighter exterior to activate it. Once the putty has a consistent light grey color, you can stop kneading it.[5]
    Fix Leaking Pipes Step 5 Version 2.jpg
    • You can buy plumbing epoxy putty from your local hardware store.
  3. Wrap the putty around the leaky area. Mold the putty around the leak on your pipe so it wraps completely around it. Make sure the putty forms a layer that's about thick around the leak so it holds in place. Taper the edges of the putty onto the pipe so it makes a watertight seal.[6]
    Fix Leaking Pipes Step 6 Version 2.jpg
    • Epoxy putty works on straight lengths of pipes as well as joints.
  4. Let the putty set for 5-10 minutes before turning your water on. Once the epoxy putty is mixed, it will set quickly so you can use your water again. Leave the putty alone for at least 5 minutes while it sets so it can solidify. Once the epoxy sets, you can turn your water back on.[7]
    Fix Leaking Pipes Step 7 Version 4.jpg
    • Epoxy putty is a temporary fix, so be sure to fully replace your pipe or contact a plumber the next day.

[Edit]Clamping Small Leaks

  1. Buy a pipe clamp that's the same size as the leaky pipe. Pipe clamps use rubber gaskets create a tight seal to secure a small leak on your pipe. You can purchase these in the plumbing section of your local hardware store, but make sure to buy a pipe clamp that is the same size and at least as long as the pipe that's leaking so you have a tight fit when you secure it.[8]
    Fix Leaking Pipes Step 8 Version 2.jpg
  2. Align the rubber gasket on the pipe with the leak. The rubber gasket is the rectangular piece inside of the clamp that makes your pipe's water-tight. Set the rubber gasket on top of the hole in your pipe so it seals the leak completely. If the leak is on the bottom of the pipe, hold the clamp in place until you secure the clamp.[9]
    Fix Leaking Pipes Step 9 Version 2.jpg
  3. Fit the clamp around the gasket and tighten the bolts. Close the clamp around your pipe so it fits tightly on it and feed the bolts provided with the clamp through the holes. Turn the nuts using a wrench to secure them to the bottom of the bolts. Continue tightening the bolts until the clamp stays in place and doesn't turn any further.[10]
    Fix Leaking Pipes Step 10 Version 2.jpg

[Edit]Putting a Slip Coupling on Your Pipe

  1. Get a slip coupling that matches the size and type of your pipe. Slip couplings are small, watertight connections that connect 2 different pieces of pipe. Look for a slip coupling has the same diameter as the pipe you need to fix and is long enough so you can cut out the leak. Before you purchase one, make sure the coupling is the same material as your pipe, such as PVC or copper.
    Fix Leaking Pipes Step 11 Version 2.jpg
    • You can buy slip couplings from your local hardware store.
    • Slip couplings can be a permanent solution to fixing your pipes and they are up to code.
  2. Mark the length of the slip coupling on your pipe. Hold the slip coupling up to the leaky spot on your pipe so the coupling extends out from each side. Use a marker to draw a line on your pipe at the end of the slip coupling. This will help ensure that you cut out the right length of pipe so the coupling can still fit.[11]
    Fix Leaking Pipes Step 12 Version 2.jpg
  3. Use a pipe cutter to cut out the leaky area on the pipe. Pipe cutters are small devices that easily slice through a pipe as you rotate them around. Set the edge of your pipe cutter inside the line you drew and tighten the screw on the bottom of the device. Rotate the pipe cutter around the pipe completely and tighten the screw again. Keep spinning and tightening the pipe cutter until it makes a clean cut through the pipe. Repeat the process in from the other line you drew.[12]
    Fix Leaking Pipes Step 13 Version 2.jpg
    • You can buy pipe cutters from your local hardware store.
    • Pipe cutters work on metal and PVC pipes.
    • Some PVC pipe cutters look like a pair of scissors. Put the blade over the pipe and slowly squeeze the cutters shut.
  4. Scrape the inside and outside of the pipe with a deburring tool. A deburring tool is a special tool used to scrape the inside and outside of the pipe to help reshape it after you make your cut. Hold the pipe steady with your nondominant hand and set the blade edge of the deburring tool inside the pipe. Scrape around the inside edge of the pipe with your tool to deburr it. The take the tool out of the pipe and scrape the outside edge.[13]
    Fix Leaking Pipes Step 14 Version 2.jpg
    • You can buy deburring tools in the plumbing section of a hardware store.
    • Make sure you deburr both sides of the cut pipe to prevent future leaks.
  5. Slide the slip coupling onto the ends of your pipe. Take your coupling and slide an end over one side of your pipe. Push the coupling on far enough so you're able to line it up with the other side of the cut pipe. Line up the other end of the coupling with the pipe and pull it over so the 2 pipes are connected by the coupling. The coupling will hold the pipes together so water can flow between them.[14]
    Fix Leaking Pipes Step 15 Version 2.jpg
    • Some couplings may make you tighten them by hand or with a wrench. Follow the directions on the packaging carefully to see if there are any additional steps.

[Edit]Warnings

  • Contact a plumber if you don't feel comfortable cutting or replacing your own pipes or if the leak is difficult to reach.

[Edit]Things You'll Need

[Edit]Applying Epoxy Putty for a Temporary Fix

  • Latex or nitrile gloves
  • Epoxy putty

[Edit]Clamping the Leak Shut

  • Pipe clamp
  • Wrench

[Edit]Putting a Coupling on Your Pipe

  • Pipe slip coupling
  • Pipe cutter
  • Measuring tape
  • Deburring tool

[Edit]Related wikiHows

[Edit]References

[Edit]Quick Summary