Gizmodo Brasil |
- Cansado do PowerPoint? Conheça alternativas gratuitas e fáceis de usar
- À noite, o céu de Marte pulsa e brilha quando visto em luz ultravioleta
- A última plataforma de gelo intacta do Ártico canadense não existe mais
- Este fóssil mostra um lagarto gigante na barriga de um monstro marinho ainda maior
| Cansado do PowerPoint? Conheça alternativas gratuitas e fáceis de usar Posted: 30 Aug 2020 02:08 PM PDT  O PowerPoint oferece muitos recursos para fazer apresentações bonitonas, mas é o que todo mundo usa há três décadas. Além disso, custa R$ 29 por mês ou R$ 299 por ano como parte do Microsoft 365. Esses programas alternativos são mais recentes, mais simples e gratuitos. CanvaO Canva é mais voltado para o design gráfico, mas possui um poderoso recurso de apresentação integrado como parte de seu conjunto de ferramentas. Você precisará atualizar para a versão Pro, que custa R$ 26,90 por mês, para obter a gama completa de modelos e outros recursos. Você também pode usar a versão gratuita. O software funciona dentro do seu navegador e é bem fácil de usar.
Você não tem tanto controle pixel a pixel sobre seus layouts como no PowerPoint nem muitas opções de transições e intervalos, mas editar os modelos que o Canva traz é muito simples e intuitivo, e começar do zero também não é nem um pouco difícil. As apresentações finalizadas podem ser facilmente compartilhadas, incorporadas ou mesmo salvas como arquivos do PowerPoint. Beautiful.aiComo você pode imaginar pelo nome, Beautiful.ai aproveita o poder da inteligência artificial para fornecer o máximo de ajuda possível com layouts e design de slides. Tudo o que você realmente precisa fazer é fornecer os ingredientes crus, e então o software se encarrega de preparar algo adequado para seu público. Com base em nossos testes, funciona muito bem.
A ideia dele é que fazer uma apresentação é mais um processo passo a passo, guiado: você insere texto e imagens e escolhe layouts e cores, e o app cuida de todo o resto. Se você ficar no plano gratuito, terá um limite de 100 slides na apresentação e um conjunto reduzido de ferramentas de colaboração; atualizar para uma versão premium custa a partir de US $ 15 por mês. PreziPrezi é um dos rivais mais bem estabelecidos do PowerPoint. Além de oferecer um amplo conjunto de recursos, ele também se integra perfeitamente a muitas outras ferramentas (como Zoom e Slack). O plano gratuito é um pouco limitado em termos de recursos a que você tem acesso, mas cobre o básico. Se você precisar de recursos mais avançados e acesso a bancos de imagens, o preço começa em US$ 5 por mês.
O aplicativo faz o possível para encorajá-lo a se afastar do padrão de série de slides para sua apresentação, com modelos mais parecidos com sites interativos com transições que pulam para lá e para cá. Esta abordagem não é adequada para todas as situações, mas oferece muito mais flexibilidade com seus layouts, e todas as ferramentas de edição online são fáceis de usar. PasteDos criadores do WeTransfer, o Paste tenta não complicar o processo de montar uma apresentação. Ele se encarrega de muitos detalhes para você, como layouts de slides, fontes e imagens, e permite que você se concentre nas partes importantes. Isso torna o processo de montar uma apresentação bonita muito mais rápido, embora o resultado final seja um pouco simplista.
A maneira como o Paste funciona e fica organizado na tela é revigorante e diferente — você pula entre slides individuais e a apresentação geral, por exemplo, em vez de ter tudo na tela de uma vez. Se precisar de mais de três pilhas de slides ou acesso para várias pessoas editarem a mesma apresentação, terá que pagar. Os preços começam em US$ 10 por mês. Apple KeynoteO Keynote vem de graça com todos os computadores Apple e você também pode usá-lo gratuitamente por meio do iCloud na web (com uma Apple ID). O Keynote tem uma interface simples e organizada e uma tonelada de modelos úteis que reduzem em muito o tempo entre o início e a finalização de algo com aparência profissional para exibir ao seu público.
Embora você não encontre uma grande quantidade de recursos de edição avançados ou sugestões de layouts inteligentes no Keynote, você pode pelo menos obter texto, formas, imagens, gráficos, tabelas e outros conteúdos em um slide de uma forma esteticamente agradável. Vale a pena dar uma olhada se você usa vários dispositivos Apple, porque tudo é sincronizado automaticamente via iCloud. Google SlidesNão há dúvidas de que o PowerPoint supera o Google Slides (ou Apresentações Google, na versão em português) no que diz respeito ao número de recursos e sofisticação geral do software, mas, novamente, o Apresentações é mais fácil de usar e funciona perfeitamente em navegadores, o que permite que ele seja usado em qualquer computador. Ele compensa a falta de transições e animações com velocidade e uma interface intuitiva
Você obtém o básico em termos de modelos e temas de layout e pode importar uma série de coisas para seus slides — de Word Art e vídeos do YouTube a Planilhas Google e seus próprios desenhos. Como seria de se esperar, o Apresentações oferece suporte ao Chromecast para transmitir suas apresentações em outras telas, e você também pode colocá-las na web também. LibreOffice ImpressSe você prefere um programa de computador tradicional, então o componente Impress do LibreOffice pode ser exatamente o que você está procurando. Em termos de design e funcionalidade, o programa de código aberto parece estar atrasado em alguns anos, mas ele não fica devendo em recursos e funcionalidade.
Você não recebe tantas orientações ou suporte quanto em alguns dos outros aplicativos que mencionamos aqui — mas tem gente que prefere assim. É você mesmo quem vai ter que montar uma apresentação cativante para impressionar seus colegas, mas o programa oferece um monte de opções e ferramentas para ajudá-lo, desde animações e transições à possibilidade de importar qualquer tipo de mídia. The post Cansado do PowerPoint? Conheça alternativas gratuitas e fáceis de usar appeared first on Gizmodo Brasil. |
| À noite, o céu de Marte pulsa e brilha quando visto em luz ultravioleta Posted: 30 Aug 2020 11:53 AM PDT  Novas observações em ultravioleta de Marte destacam complexos padrões de circulação na atmosfera marciana, incluindo pulsos de luz noturna assustadoramente regulares invisíveis a olho nu. Novas pesquisas mostram que a atmosfera do planeta vermelho, quando vista através da luz ultravioleta, é muito movimentada, mas apenas à noite e durante certas estações do ano. Esses efeitos atmosféricos pulsantes e brilhantes não são totalmente compreendidos, e sua presença nos lembra que Marte tem uma atmosfera mais complicada do que parece. Publicado no Journal of Geophysical Research: Space Physics, revista científica publicada pela American Geophysical Union, o novo estudo foi possibilitado por um instrumento chamado espectrômetro de imagem ultravioleta (IUVS, na sigla em inglês) na sonda MAVEN da NASA, que está em órbita ao redor de Marte desde 2014. O IUVS vem fornecendo um novo olhar sobre o nosso planeta vizinho, revelando padrões de circulação nunca antes vistos na atmosfera marciana. O novo artigo, liderado por Nick Schneider do Laboratório de Física Atmosférica e Espacial (LASP, em inglês) da Universidade do Colorado, analisou dados coletados pelo IUVS ao longo de dois anos marcianos consecutivos (um ano em Marte é igual a 687 dias na terra). Ao estudar Marte em luz ultravioleta, os pesquisadores foram capazes de visualizar os efeitos dos ventos em escala global e das ondas altas na atmosfera. "As imagens da MAVEN trazem nossos primeiros insights sobre os movimentos atmosféricos na atmosfera intermediária de Marte, uma região crítica onde as correntes de ar transportam gases entre as camadas mais baixas e mais altas", explicou Schneider. Essas ações um tanto psicodélicas, conhecidas como marés atmosféricas, se formam a partir de uma recombinação de átomos de nitrogênio e oxigênio na mesosfera noturna de Marte – a camada intermediária entre a estratosfera e a termosfera. Ao ver Marte na luz ultravioleta, os cientistas foram capazes de acompanhar as mudanças nos padrões do vento nas diferentes estações, que influenciam as noites de brilho atmosférico. De acordo com a pesquisa, essas ondas que circundam o planeta também são influenciadas pelo calor solar e distúrbios topográficos causados pelos vulcões maciços de Marte.
O brilho noturno visto na região polar norte. A causa da forma em espiral permanece um mistério. Imagem: NASA/MAVEN/Goddard Space Flight Center/CU/LASP Na verdade, as regiões vulcânicas montanhosas de Marte são conhecidas por produzirem fenômenos fascinantes e bizarros, incluindo uma nuvem enorme e alongada que reaparece como um relógio acima de Arsia Mons, um vulcão de 20 quilômetros de altura localizado perto do equador marciano. "As principais descobertas da MAVEN sobre perda de atmosfera e mudança climática mostram a importância desses vastos padrões de circulação que transportam gases atmosféricos ao redor do globo e da superfície até a borda do espaço", explicou Sonal Jain, cientista e coautor do estudo do LASP. Curiosamente, os pulsos atmosféricos acontecem sempre três vezes por noite, mas apenas durante a primavera e o outono. Os cientistas também documentaram ondas e espirais acima das regiões polares de inverno, junto com alguns pontos mais brilhantes vistos nos pólos de inverno.
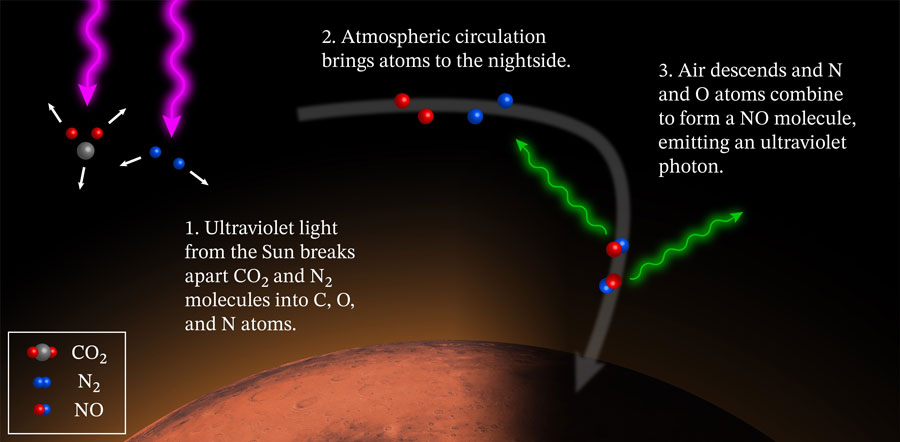
Este infográfico acima exemplifica como funciona o fenômeno. Primeiro, os raios UV do sol quebram moléculas de dióxido de carbono e nitrogênio, transformando-as em átomos de carbono, oxigênio e nitrogênio. Depois, a própria atmosfera marciana se encarrega de levar esses átomos para alturas elevadas. Por fim, quando o ar desce de volta para a atmosfera, os átomos de nitrogênio e oxigênio se combinam, formando uma molécula de monóxido de nitrogênio que emite um fóton ultravioleta. Imagem: NASA/MAVEN/Goddard Space Flight Center/CU/LASP Nessas áreas brilhantes, os gases são empurrados para baixo por ventos verticais, fazendo-os entrar em regiões com densidade atmosférica mais alta. Isso serve para acelerar as reações químicas responsáveis pelo óxido nítrico, que alimentam o brilho ultravioleta. As emissões de raio UV ocorrem predominantemente em altitudes que atingem 64 quilômetros acima da superfície, com algumas manchas gigantescas de 965 quilômetros de diâmetro. Essas emissões não devem ser confundidas com um brilho verde de Marte – um matiz visível causado pelos raios do Sol que estimulam as moléculas de oxigênio na atmosfera superior. Se um ser humano estivesse em solo marciano, ele não conseguiria enxergar esses espetáculos noturnos, pois são invisíveis a olho nu. No futuro, quando for possível colonizar o planeta vermelho, os novos colonos poderão se divertir com essas luzes noturnas usando óculos de proteção ultravioleta – semelhante ao que acontece no Norte da Terra, que em algumas épocas do ano apresenta belos efeitos visuais noturnos, como é o caso da aurora boreal. Sem dúvida, seria um espetáculo, já que as manchas brilhantes que cruzam o céu de Marte à noite atingem velocidades de até 290 km/h. The post À noite, o céu de Marte pulsa e brilha quando visto em luz ultravioleta appeared first on Gizmodo Brasil. |
| A última plataforma de gelo intacta do Ártico canadense não existe mais Posted: 30 Aug 2020 09:32 AM PDT  O Ártico canadense tem sido atingido em cheio pela crise climática. A região não registrava temperaturas tão altas pelo menos nos últimos 115 mil anos, e o gelo continua derretendo em ritmo acelerado. Por lá, ainda havia um manto de gelo intacto que parecia o último resquício das grandes plataformas gélidas no local. Pois é, havia, já que ela desabou no início de agosto. Segundo o Serviço Canadense de Gelo, a última plataforma de gelo totalmente intacta deixou de existir, perdendo mais de 40% de sua área em apenas dois dias, no final de julho. O agora "falecido” gelo Milne, como era conhecido, ficava no território pouco povoado de Nunavut, na orla da Ilha Ellesmere. A placa flutuante que virou água despejou no Oceano Ártico o equivalente a 80 quilômetros quadrados. Para se ter uma ideia, essa quantidade é maior do que toda a ilha de Manhattan, em Nova York, que cobre cerca de 60 quilômetros quadrados. Pesquisadores já sabiam há muito tempo que a plataforma Milne e suas calotas polares estavam perdidas, mas ainda é um choque ver isso acontecer. O Ártico está esquentando duas vezes mais rápido que o resto do mundo, mas 2020 tem sido um ano particularmente mais quente ainda, com ondas de calor se propagando por toda a região. Segundo a Reuters, este verão no Ártico ficou 5 graus Celsius acima da média dos últimos 30 anos. Em 25 de julho, as temperaturas chegaram a 21,9°C, de acordo com dados coletados pela base de pesquisa de Eureka, na Ilha Ellesmere. Essa teria sido a temperatura mais alta da história já registrada no norte do planeta. A plataforma de gelo Milne não foi a única vitima das altas temperaturas na Terra. Entre o final de julho e início de agosto, as duas calotas polares de St. Patrick na Ilha Ellesmere derreteram completamente. O calor que atinge todo o Ártico também fez com que o gelo marinho atingisse seu nível mais baixo em julho desde que a manutenção dos registros, há 40 anos.
“Uma enorme parte da plataforma de Gelo Milne entrou em colapso no Oceano Ártico, produzindo uma ilha de gelo de aproximadamente 79 quilômetros quadrados. Acima das temperaturas normais do ar, ventos fortes e mar aberto à frente da massa de gelo contribuíram para o desprendimento do bloco”, diz a mensagem do Serviço Canadense de Gelo no Twitter. O colapso da plataforma de gelo Milne é reflexo do que acontecendo do outro lado da Terra, na Antártica, onde várias plataformas gigantes de gelo vêm derretendo desde a década 1990. As geleiras estão diminuindo a um ritmo alarmante, então sim, o gelo em todas as regiões do planeta estão superaquecendo mais rápido que o normal. Esta é uma má notícia para todos nós. Apesar das plataformas de gelo flutuarem, elas possuem um papel fundamental na retenção do gelo terrestre. Sem esse suporte, mais gelo pode derreter, ir para o mar e aumentar no nível dos oceanos, sobrecarregando cidades costeiras. O gelo Milne no Canadá retinha uma quantidade considerada pequena de gelo glacial, mas a história é muito diferente na Antártica. Uma nova pesquisa publicada no inicio de agosto mostra que, se não reduzirmos as emissões de carbono para desacelerar o aquecimento global, o aumento do nível do mar pode causar US$ 14,2 trilhões em danos à infraestrutura terrestre só neste século. Por isso, precisamos salvar o gelo para salvar a nós mesmos. The post A última plataforma de gelo intacta do Ártico canadense não existe mais appeared first on Gizmodo Brasil. |
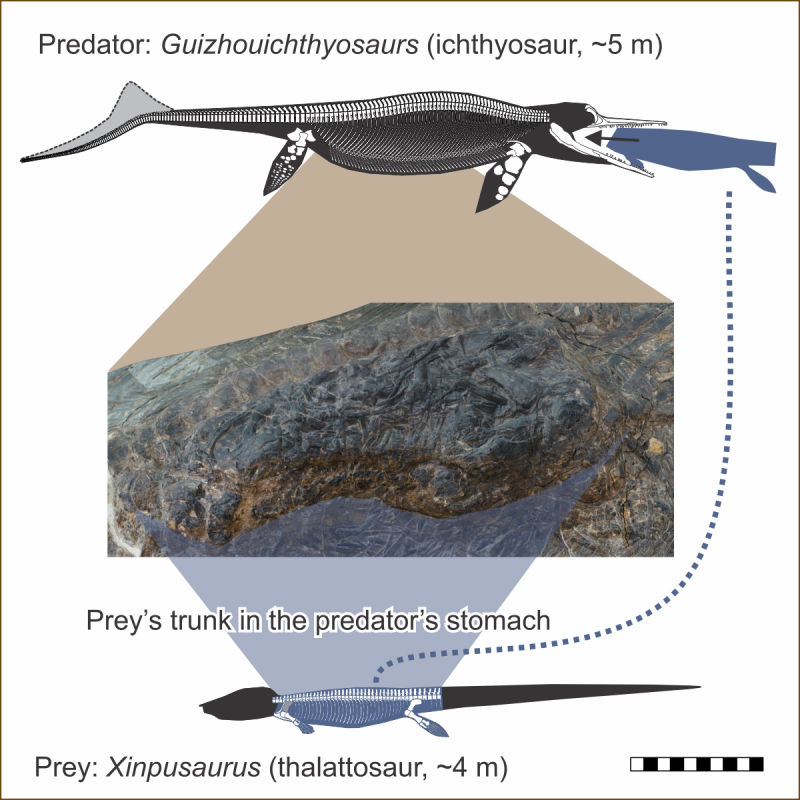
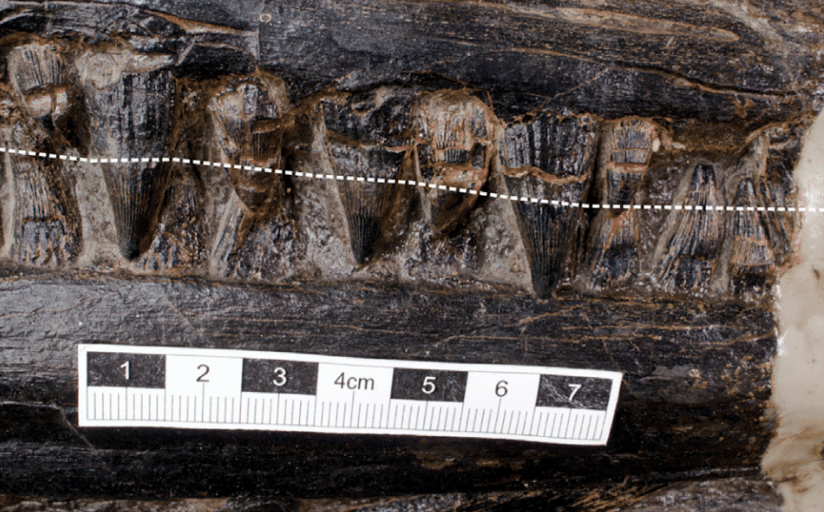
| Este fóssil mostra um lagarto gigante na barriga de um monstro marinho ainda maior Posted: 30 Aug 2020 06:54 AM PDT  Como o mestre Jedi Qui-Gon Jinn disse uma vez em Star Wars: "Há sempre um peixe maior". Ou, no caso do Período Triássico, que data de 252 a 201 milhões de anos atrás, sempre há um réptil aquático maior, como é o caso de um fóssil recém-descoberto que mostra um predador gigante dentro de um animal maior ainda. Esta é a contestação de uma nova pesquisa publicada na iScience, que oferece a evidência direta mais antiga de "megapredação" no registro fóssil, em que um enorme predador se alimenta de presas tão grandes quanto ele. O fóssil, encontrado em uma pedreira na província de Guizhou, no sudoeste da China, parece mostrar um ictiossauro de cinco metros de comprimento logo após ingerir um talattossauro pouco menor que si mesmo, de quatro metros. É provável que o ictiossauro tenha morrido logo após banquete – como diz aquele ditado que é bom nunca ter os olhos maiores que a barriga. Os ictiossauros eram répteis aquáticos parecidos com os golfinhos que surgiram durante o Triássico. Este espécime em particular pertencia a uma espécie de ictiossauro conhecido como Guizhouichthyosaurus tangae, que crescia até dez metros. Enquanto isso, sua presa, uma espécie de talattossauro chamada Xinpusaurus xingyiensis, era mais parecida com um lagarto, com quatro membros usados para nadar. O novo fóssil é a primeira evidência direta a sugerir que pelo menos algumas espécies de ictiossauros eram predadores semelhantes às baleias orcas.
Esta ilustração mostra o tamanho aproximado das duas espécies. O ictiossauro media cerca de 5 metros de comprimento, enquanto que sua presa tinha quase 4 metros. Imagem: Da-Yong Jiang/iScience O fóssil quase completo, datado de 240 milhões de anos, sugere que o ictiossauro engoliu um animal não muito menor do que ele, mas que a conclusão foi fatal para o predador. Antes dessa descoberta, os cientistas “nunca encontraram restos de um grande réptil no estômago de predadores gigantescos da era dos dinossauros, como répteis marinhos e dinossauros”, explicou Ryosuke Motani, coautor do estudo e paleontólogo da Universidade da Califórnia, em um comunicado de imprensa. Antes dessa descoberta, os cientistas pensavam que os ictiossauros se alimentavam exclusivamente de peixes e cefalópodes (lulas, polvos, entre outras espécies). "Encontrar qualquer animal que não seja peixe ou lula dentro do estômago de um ictiossauro é incrivelmente raro – na verdade, já é bastante difícil encontrar esses animais no interior da espécie em questão", disse Dean Lomax, paleontólogo da Universidade de Manchester, que não está envolvido nesta descoberta. "Apenas um punhado de outros tipos de animais foram identificados no estômago de um ictiossauro, então a descoberta de um jantar de talattossauro é altamente incomum". Lomax sabe uma ou duas coisas sobre fósseis incrustados dentro de fósseis. Em 2018, ele foi co-autor de um artigo de pesquisa que descreve um fóssil de ictiossauro grávido com vários filhotes que ainda iriam nascer, localizados dentro de suas costelas. "Uma das coisas mais significativas sobre espécimes como este é que eles fornecem informações únicas e diretas sobre o comportamento de espécies extintas há milhões de anos. É fácil presumir que X se alimentou de Y, mas quando você tem evidências como essa, não há mais suposições", completou Lomax.
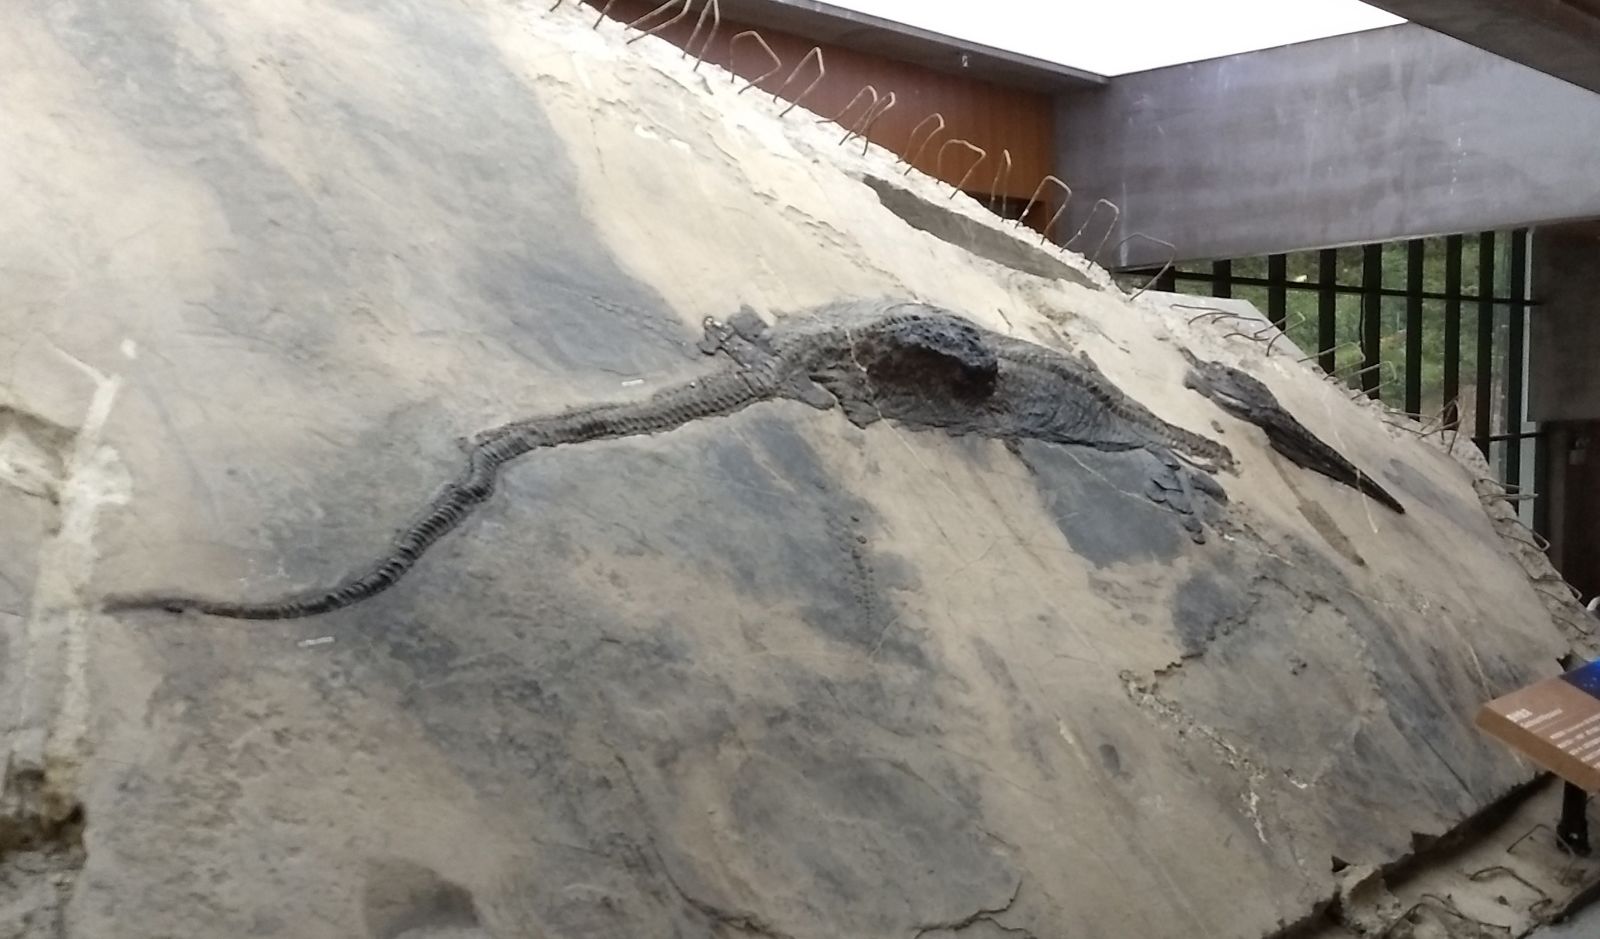
O fóssil mostra que o estômago do ictiossauro estava distendido. Imagem: Ryosuke Motani Contudo, os autores admitem que não está claro se o novo fóssil é um exemplo de predação ou eliminação. Dadas as evidências, não parece que o ictiossauro se alimentou do animal já morto, pois partes do corpo em decomposição tendem a cair durante a alimentação. Neste espécime, é exatamente o oposto: os membros do talattossauro ainda estão presos ao seu corpo – só falta a cauda. Surpreendentemente, os paleontólogos encontraram a cauda desmembrada fossilizada a poucos metros de distância, que poderia ter sido perdida durante seu encontro fatídico com o ictiossauro. Independentemente disso, as novas evidências sugerem que essa espécie de ictiossauro, seja caçador ou necrófago, consumia grandes refeições, algo que não era conhecido até então. O fato da cauda ter sido encontrada nas proximidades parecia bom demais para ser verdade, então perguntamos a Lomax o que ele achava. "Seu argumento sobre a cauda também despertou minha curiosidade, porque os autores observam que o ‘predador provavelmente morreu logo após ingerir a presa'. Eles acreditam que isso aconteceu porque a cauda isolada de um talattossauro era do mesmo indivíduo consumido pelo ictiossauro. Se isso estiver correto, então pode sugerir que o predador mordeu mais do que pode mastigar, pois foi uma refeição muito maior do que o previsto", disse. É difícil saber exatamente por que o ictiossauro morreu, mas assumindo que essa interpretação esteja correta – que a cauda isolada pertence ao mesmo talattossauro -, então a morte do ictiossauro pode estar ligada à sua refeição bastante pesada. Outra possibilidade é que as duas criaturas marinhas morreram uma sobre a outra e os fósseis estão meramente justapostos. E, de fato, o fóssil do talattossauro não dá sinais de ter sido degradado pelo ácido estomacal, mas, para ser justo, essa observação também faz sentido ao se considerar a primeira hipótese: que o ictiossauro morreu logo após engolir o talattossauro, interrompendo todos os sinais vitais do organismo.
Estes eram os dentes do ictiossauro. Imagem: Da-Yong Jiang/iScience A descoberta está lançando uma nova luz sobre os hábitos alimentares dos ictiossauros, que supostamente se alimentavam inteiramente de cefalópodes devido aos seus dentes pequenos e parecidos com pinos. As novas evidências sugerem o contrário – que esses dentes eram usados para agarrar presas, estilhaçar espinhos e rasgar a carne. "Agora, podemos considerar seriamente que eles comiam animais de grande porte, mesmo quando tinham os dentes presos. Está bastante claro que este animal poderia processar um alimento muito maior usando dentes cegos", explicou Motani em comunicado à Cell Press. Predadores modernos, como orcas e focas-leopardo, aplicam táticas predatórias semelhantes, em um possível exemplo de evolução convergente. E, de fato, o próprio ictiossauro é o garoto-propaganda dessa evolução, onde espécies não relacionadas evoluem com características físicas parecidas. Normalmente, os ictiossauros são comparados aos golfinhos, mas como mostra esta nova pesquisa, a espécie ficou mais próxima das baleias assassinas. The post Este fóssil mostra um lagarto gigante na barriga de um monstro marinho ainda maior appeared first on Gizmodo Brasil. |
 Captura de tela: Canva
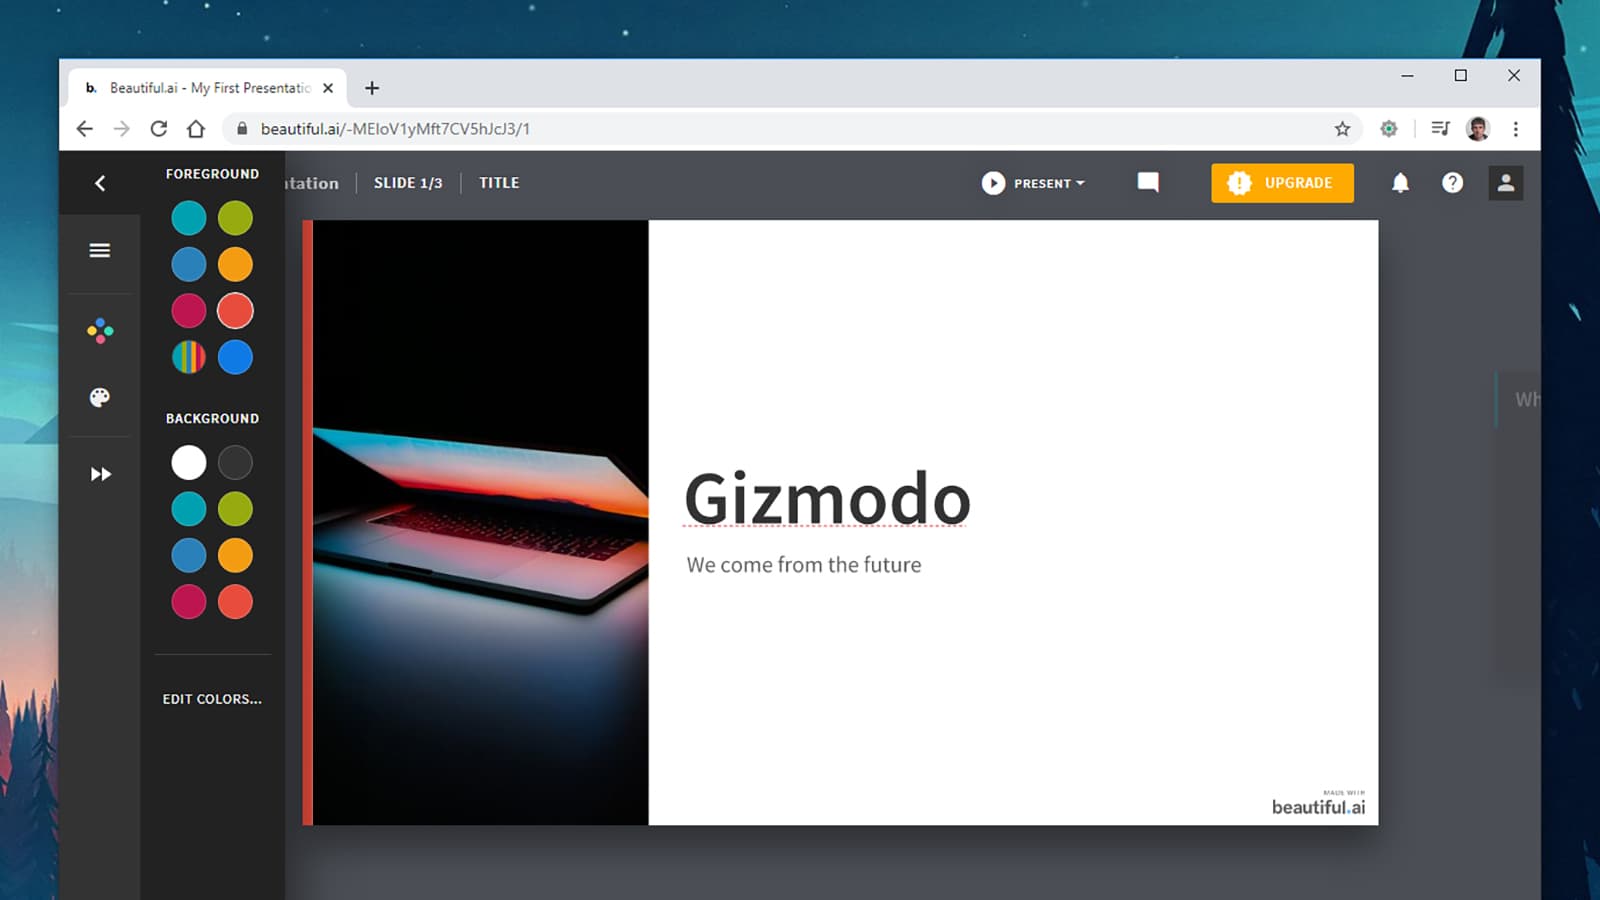 Captura de tela: Beautiful.ai
 Captura de tela: Prezi
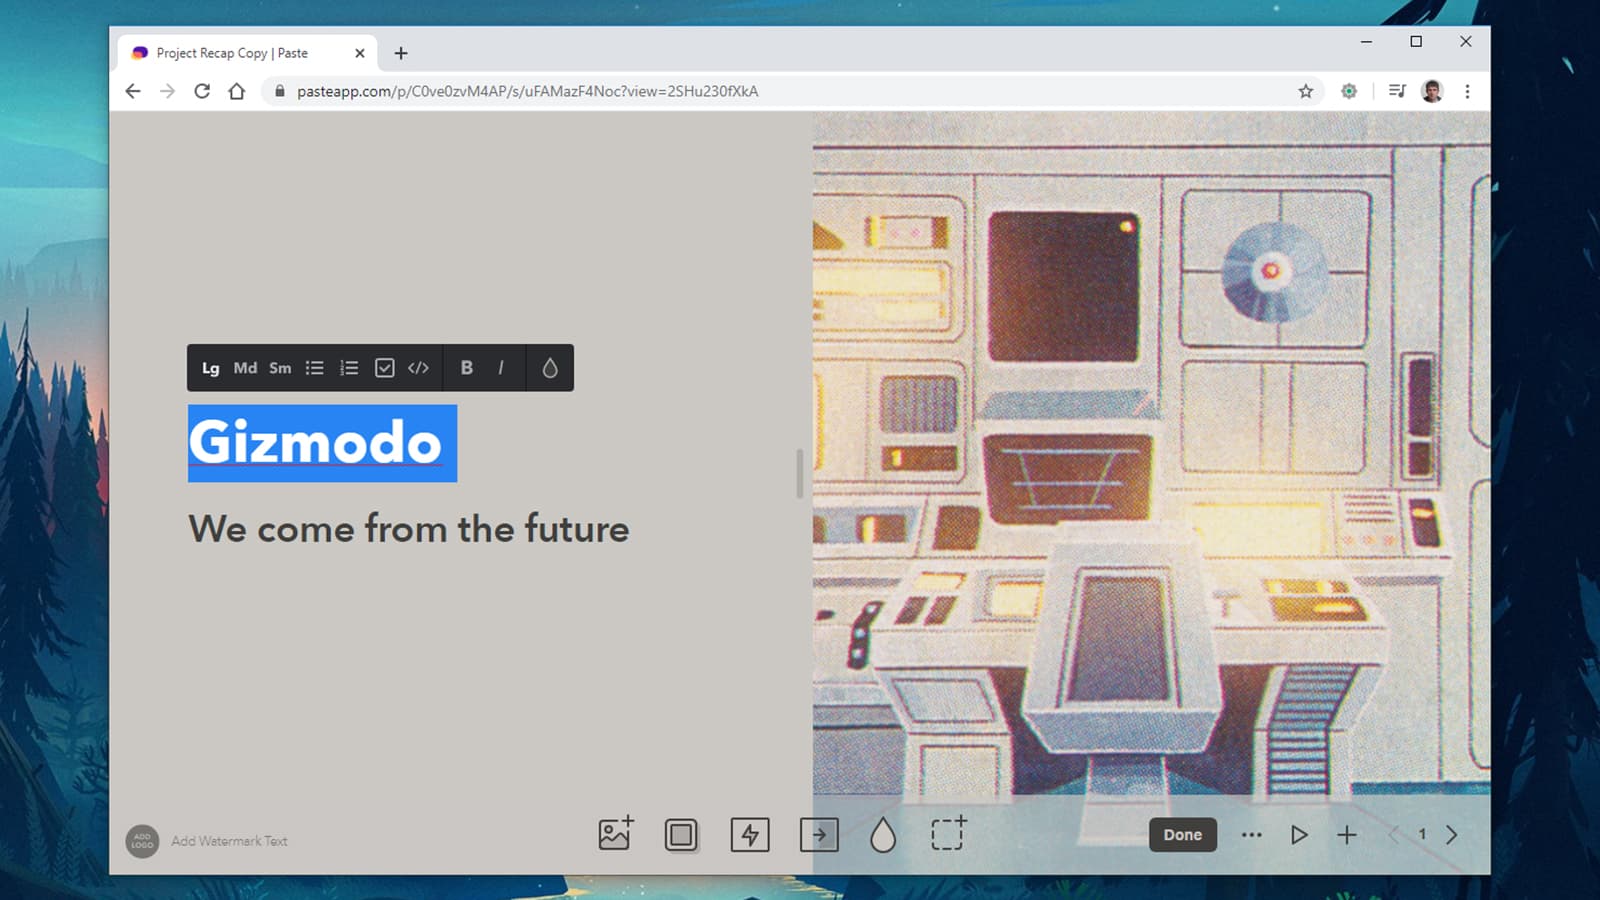 Captura de tela: Paste
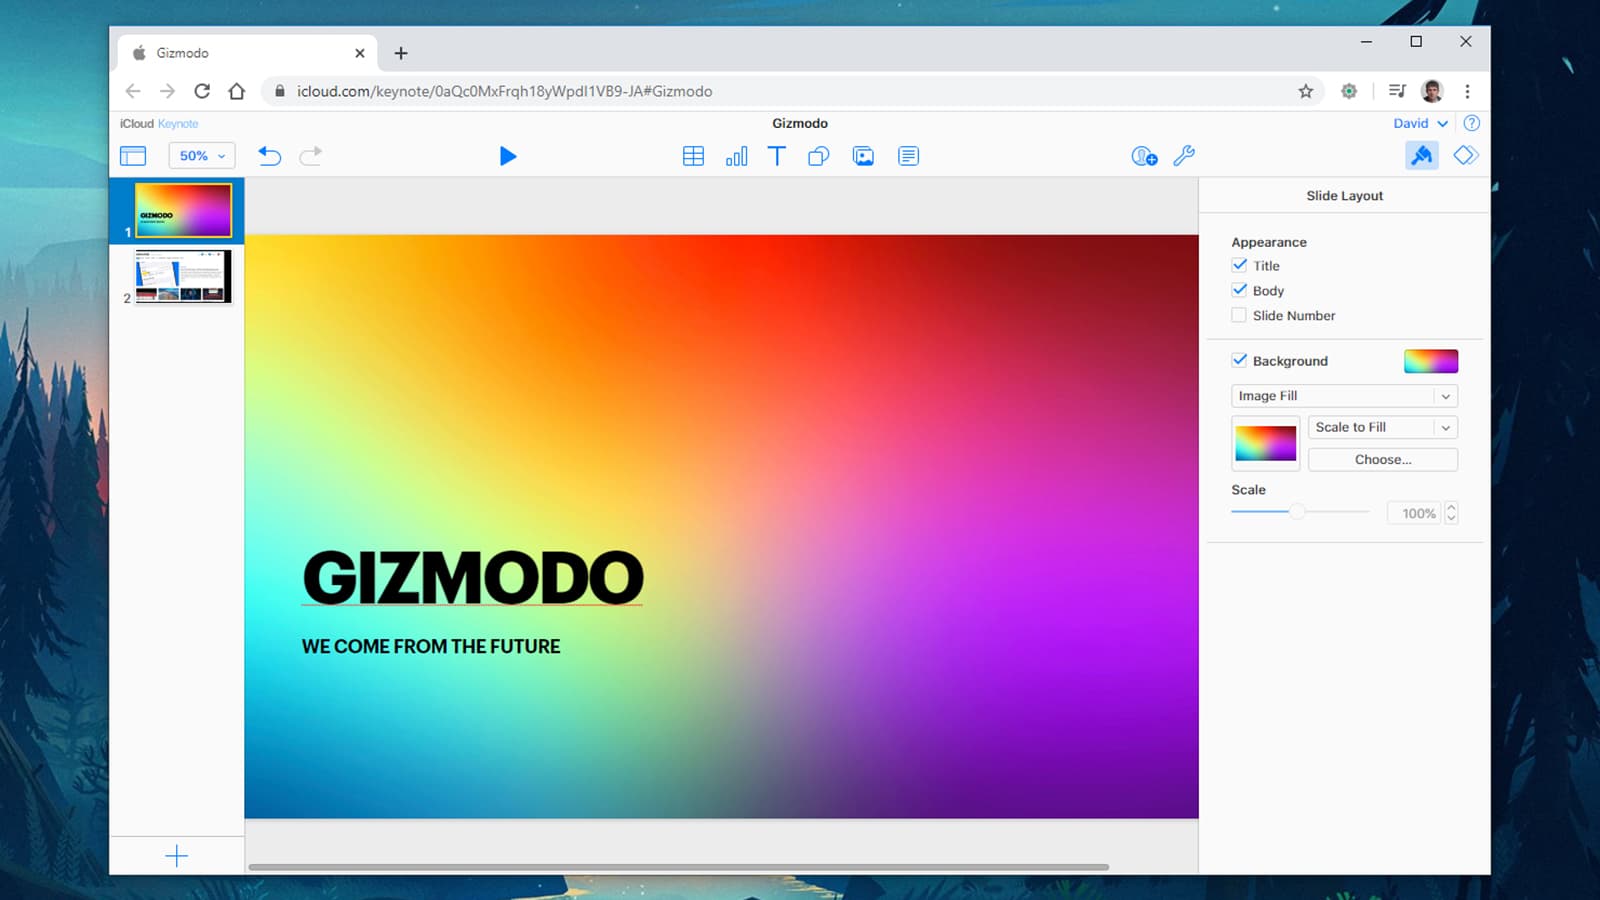 Captura de tela: Keynote
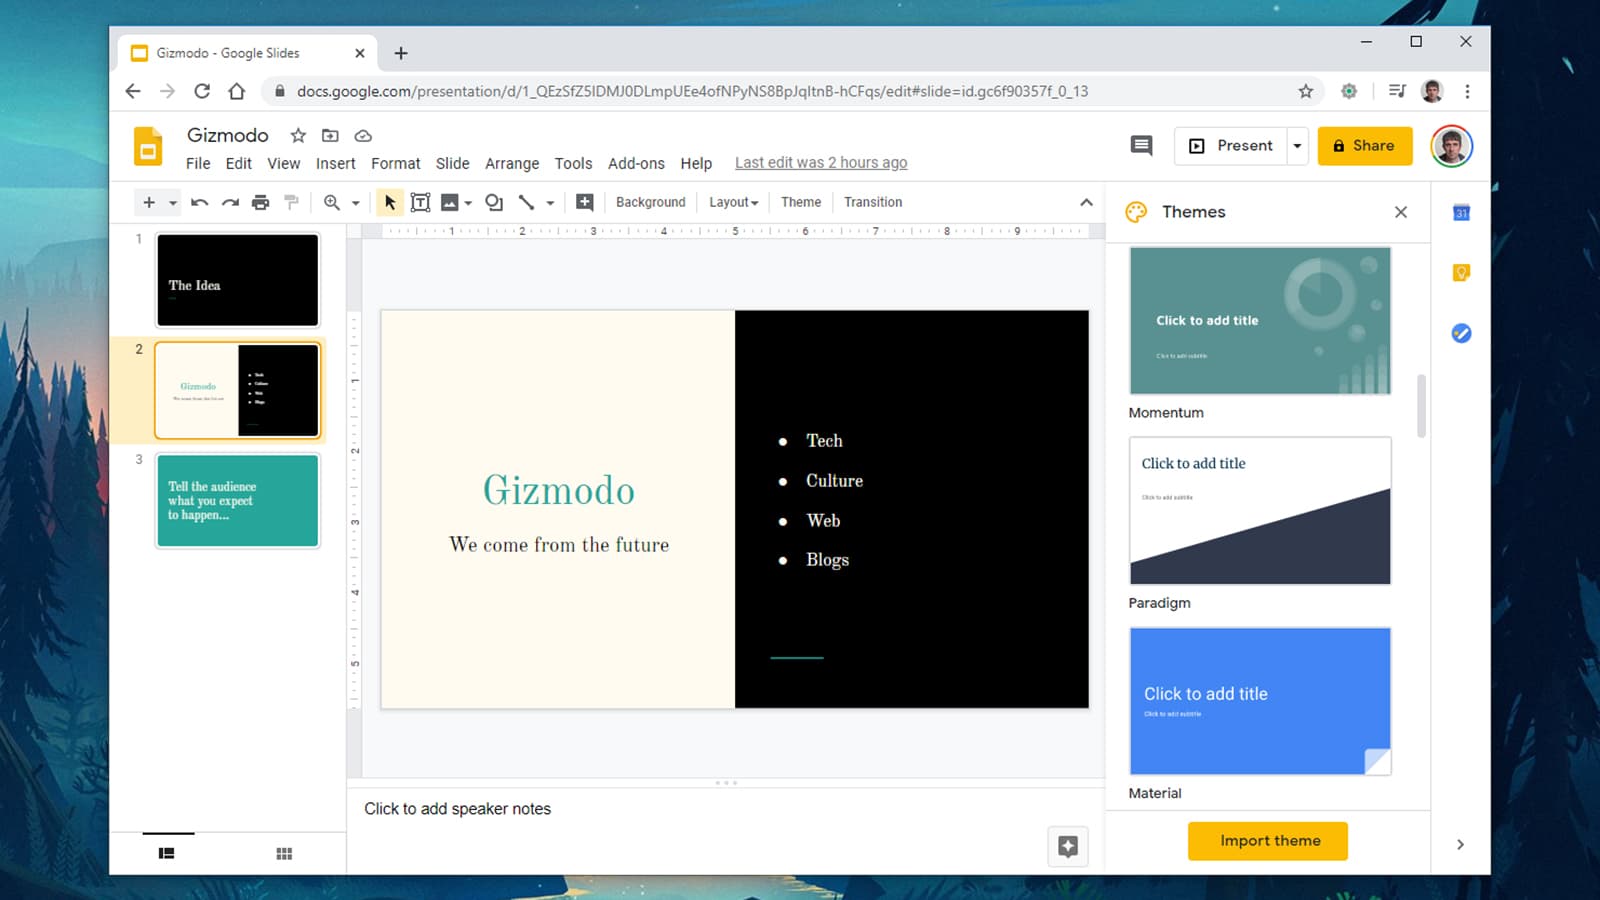 Captura de tela: Google Slides
 Captura de tela: LibreOffice Impress
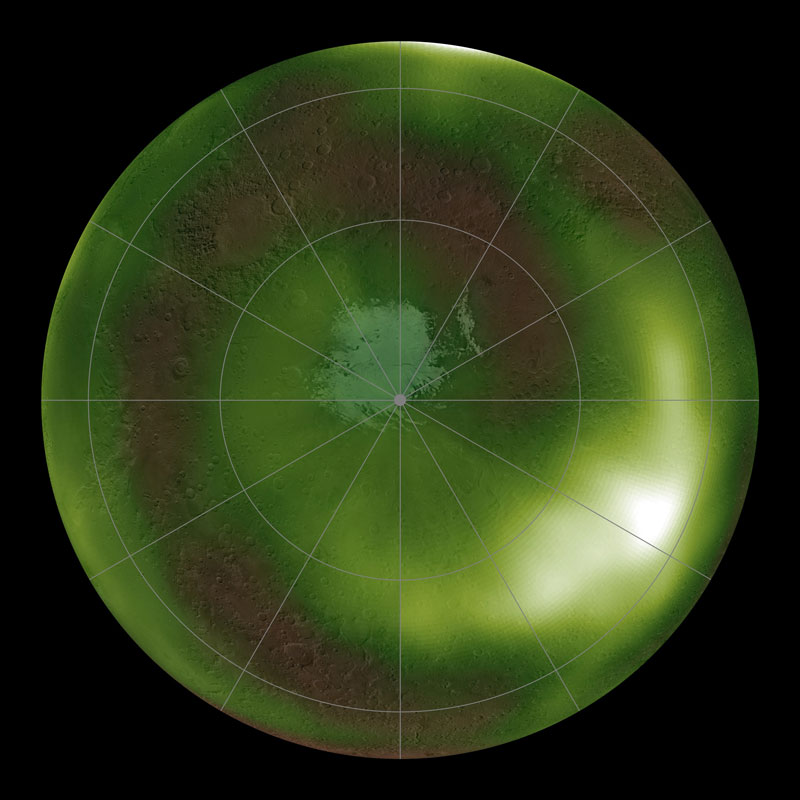
| You are subscribed to email updates from Gizmodo Brasil. To stop receiving these emails, you may unsubscribe now. | Email delivery powered by Google |
| Google, 1600 Amphitheatre Parkway, Mountain View, CA 94043, United States | |
 Illustration by Alex Castro / The Verge
 Jeff Daniels as James Comey | Showtime
  Photo by Matt Kennedy / Marvel Studios
  Illustration by Alex Castro / The Verge
  Illustration by Alex Castro / The Verge


