sábado, 30 de maio de 2020

Gizmodo Brasil

Gizmodo Brasil


SpaceX realiza com sucesso lançamento de cápsula tripulada em direção à ISS

Posted: 30 May 2020 01:02 PM PDT

Momento do lançamento do foguete Falcon 9 da SpaceX

A SpaceX realizou com sucesso o lançamento de seu foguete Falcon 9 com dois astronautas da NASA à bordo da cápsula Crew Dragon, no Centro Espacial Kennedy, na Flórida.

O feito deste sábado (30) marca a primeira vez em que a SpaceX faz um lançamento de um humano para o espaço, além de encerrar um intervalo de quase nove anos desde a última vez que uma missão tripulada foi lançada do solo americano.

O lançamento de um foguete com tripulação é um feito inédito para uma companhia privada.

O Falcon 9 liberou a cápsula Crew Dragon na órbita baixa da Terra cerca de 12 minutos após ser lançado, às 16h22 (horário de Brasília). Agora, os astronautas da NASA, Robert Behnken e Douglas Hurley, passarão as próximas horas tentando atracar com a Estação Espacial Internacional (ISS, na sigla em inglês). Isso deve acontecer no domingo às 11:29h (horário de Brasília).

Durante a missão, Behnken e Hurley testarão componentes críticos da Crew Dragon, como seu ambiente artificial, displays, sistema de controle, propulsores de manobras, etc. O encontro com a ISS será realizado de forma autônoma, mas os astronautas poderão assumir o controle manual caso as coisas não se saiam bem.

Behnken e Hurley são veteranos do Programa de Ônibus Espaciais (Space Shuttle), e ambos têm ampla experiência em testes e voo. Os astronautas estão em quarentena desde 13 de maio, e com precauções extras dada a pandemia de COVID-19.

Quando estiverem na ISS, a dupla se juntará ao astronauta da NASA Chris Cassidy e aos cosmonautas Anatoly Ivanishin e Ivan Vagner. Nenhuma data foi marcada para o retorno da cápsula Crew Dragon, mas a nave pode ficar ancorada por mais de 100 dias. Durante o retorno, os astronautas reentrarão na Crew Dragon, farão uma reentrada atmosférica e mergulharão no Oceano Atlântico.

O evento deveria ter acontecido na última quarta-feira (27), mas o mau tempo impediu o lançamento. Havia uma certa apreensão para a realização deste sábado, já que a Força Aérea dos EUA tinha atribuído 50% de chances de condições meteorológicas favoráveis.

O lançamento deste sábado marca um passo importante para o Programa de Tripulação Comercial da NASA. Até agora, os EUA estavam utilizando a nave espacial russa Soyuz para transportar astronautas para a ISS. Em 2016, a NASA começou uma parceria com a SpaceX e a Boeing para desenvolver cápsulas orbitais para tripulação. O SpaceX Crew Dragon é o primeiro a cruzar a linha de chegada.

The post SpaceX realiza com sucesso lançamento de cápsula tripulada em direção à ISS appeared first on Gizmodo Brasil.

Facebook diz que não apagará post de Trump incitando violência contra manifestantes

Posted: 30 May 2020 11:40 AM PDT

Mark Zuckerberg

O Facebook não irá remover uma publicação de Donald Trump, presidente dos Estados Unidos, que incentivava a violência contra manifestantes que protestam contra a brutalidade policial em Mineápolis, disse o CEO da rede social, Mark Zuckerberg, nesta sexta-feira (29). Na manhã de sexta, o Twitter marcou duas publicações idênticas feitas no perfil de Trump e na conta oficial da Casa Branca por ferir as regras sobre “enaltecimento de violência”.

Nessas publicações, as afirmações de Trump ofereciam suporte militar ao governador de Minnesota e ameaçavam enviar a Guarda Nacional se o prefeito de Mineápolis, Jacob Frey, não “desse um jeito nas coisas e colocasse a cidade sob controle”.

Trump ainda disse que se os protestos de “bandidos”não fossem interrompidos, ele “assumiria o controle, mas, quando o saque começar, o tiroteio começa” – uma citação que faz alusão a um chefe da polícia de Miami que aterrorizou comunidades negras e provocou motins nos anos 1960.

A frase "quando o saque começa, o tiroteio começa" ("when the looting starts, the shooting starts") foi cunhada em uma entrevista coletiva em dezembro de 1967 pelo chefe da polícia de Miami, Walter Headley, durante a revolta daquele ano por moradores negros.

Embora Zuckerberg descreva corretamente os comentários de Trump como uma “retórica divisória e inflamatória”, o Facebook acabou decidindo manter o post por causa do compromisso da plataforma com a “livre expressão” e argumentou que a alusão a uma iminente resposta militar é uma questão de interesse público.

“Embora o post tivesse uma referência histórica preocupante, decidimos mantê-lo no ar porque as referências à Guarda Nacional significavam que o lemos como um aviso sobre ações estatais, e achamos que as pessoas precisam saber se o governo está planejando fazer uso da força”, escreveu Zuckerberg em um post no Facebook.

“Sei que muitas pessoas estão chateadas por termos mantido os posts do presidente, mas nossa posição é que devemos permitir a máxima expressão possível, a menos que isso cause risco iminente de danos ou perigos específicos explicitados em políticas claras.”

A decisão do Facebook vem depois de um longo processo de deliberação, segundo Zuckerberg. A empresa foi duramente criticada por sua neutralidade e particularmente por seu contraste com a resposta do Twitter, que escondeu os posts de Trump sob um aviso em questão de horas. Internamente, as opiniões parecem ter sido profundamente divididas, e vários posts vazados mostram funcionários decretando falta de ação no Facebook, de acordo com o Verge.

Na resposta de Zuckerberg, ele destaca a tentativa de Trump de voltar atrás em seus comentários com tuítes subsequentes afirmando que a expressão não era uma ameaça – o que, evidentemente, era.

O CEO do Facebook também provocou o Twitter, explicando que se o post de Trump tivesse violado as política do Facebook contra incitação de violência, ele teria tomado ações mais fortes de que seu concorrente.

“Ao contrário do Twitter, não temos uma política de colocar um aviso sob posts que possam incitar à violência, porque acreditamos que se um post incita à violência, ele deve ser removido independentemente de ser ou não digno de notícia, mesmo que venha de um político”, disse Zuckerberg.

O que é papo furado vindo de uma plataforma que não fez literalmente nada nesta situação.

Por fim, Zuckerberg argumentou que o Facebook preservou os comentários do presidente porque “a responsabilidade por aqueles em posições de poder só pode acontecer quando o seu discurso é escrutinado a céu aberto.”

Essa linha de pensamento é muito parecida com o argumento que o Facebook defendeu no ano passado, quando possibilitou uma brecha para que mentiras fossem veiculadas em campanhas publicitárias políticas.

The post Facebook diz que não apagará post de Trump incitando violência contra manifestantes appeared first on Gizmodo Brasil.

Como acompanhar a segunda tentativa do lançamento de astronautas para ISS feito pela SpaceX

Posted: 30 May 2020 09:27 AM PDT

A cápsula Crew Dragon no topo do foguete Falcon 9 da SpaceX

ATUALIZAÇÃO: Deu certo a segunda tentativa de lançamento realizada neste sábado (30) e você pode acompanhar os detalhes aqui. O texto abaixo não foi alterado, pois conta com o contexto da missão.

O mau tempo impediu que a SpaceX realizasse o seu primeiro lançamento de astronautas da NASA para a Estação Espacial Internacional (ISS, na sigla em inglês). A companhia e a agência especial irão tentar novamente neste sábado (30) o lançamento da cápsula Crew Dragon – e você pode assistir tudo ao vivo.

Os astronautas Robert Behnken e Douglas Hurley vão novamente se vestir com seus trajes espaciais chiques feitos pela SpaceX na expectativa de chegarem à baixa órbita da Terra.

O lançamento do foguete Falcon 9 da Space, com sua cápsula Crew Dragon, está programada para acontecer às 16h22 (horário de Brasília). Você pode assistir tudo ao vivo por meio da NASA TV – a cobertura está rolando desde o meio-dia deste sábado.

Toda a atenção estará voltada ao Complexo de Lançamento 39A do Centro Espacial Kennedy da NASA, na Flórida, já que um lançamento bem-sucedido marcará a primeira vez em que a SpaceX fará o lançamento de um humano para o espaço – algo inédito para uma empresa privada. Além disso, essa será a primeira vez em anos que astronautas da NASA são lançados a partir do solo dos EUA.

A primeira tentativa de lançamento aconteceu na última quarta-feira, mas foi interrompida devido às condições climáticas desfavoráveis.

“Simplesmente havia muita eletricidade na atmosfera”, explicou o administrador da NASA, Jim Bridenstine, em uma coletiva de imprensa que aconteceu após o evento ser adiado. “Não havia uma tempestade de relâmpagos ou ano assim, mas havia uma preocupação de que se fizéssemos o lançamento, ele poderia desencadear os relâmpagos.”

Como relata a NASA, tanto o foguete Falcon 9 quanto a cápsula Crew Dragon “permanecem em boa forma e estão prontos para o lançamento na plataforma”. Como aconteceu na quarta-feira, o único obstáculo restante é o clima, e mais uma vez ele não parece dar muitas tréguas. Na sexta-feira (29), a Força Aérea dos EUA atribuiu 50% de chances de condições meteorológicas favoráveis para o lançamento de hoje. As preocupações específicas com o tempo estão relacionadas com o potencial de chuva e o acúmulo nuvens cumulonimbus.

Behnken e Hurley dentro da cápsula Crew Dragon
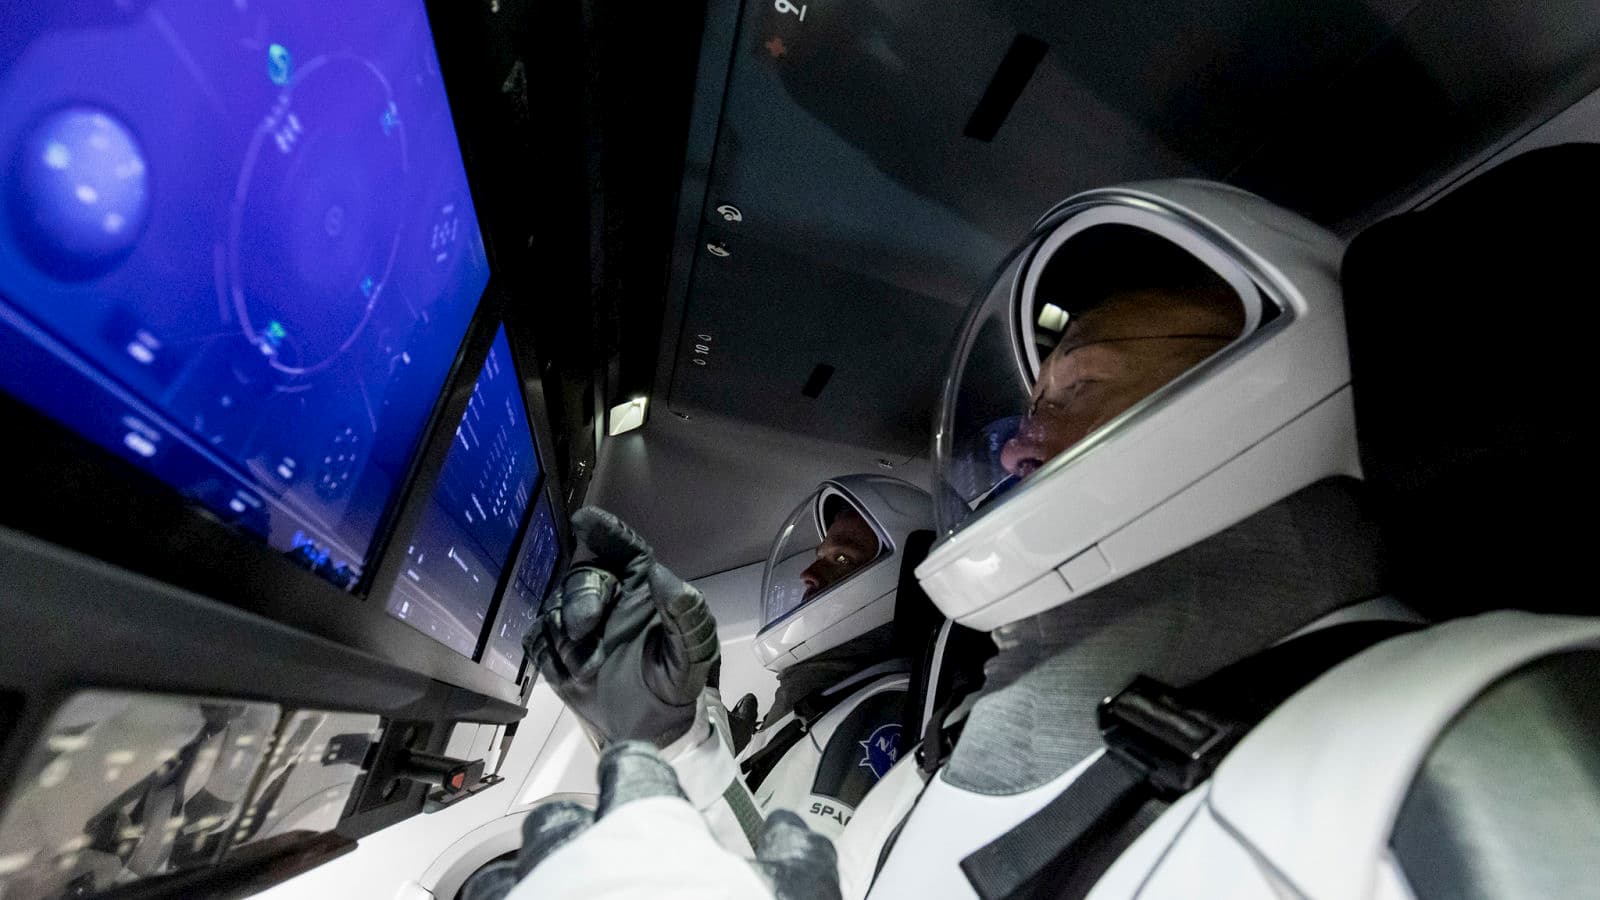
Behnken e Hurley dentro da cápsula Crew Dragon na última quarta-feira (27), antes do adiamento. Imagem: SpaceX

Se o lançamento de hoje for cancelado, a NASA e SpaceX farão uma nova tentativa no domingo, às 16h (horários de Brasília). Infelizmente, a previsão do tempo para amanhã também não é fantástica – com a Força Aérea dos EUA indicando 40% de chances de uma condição favorável ao lançamento.

Behnken e Hurley já estiveram no espaço e devem atracar na Estação Espacial Internacional no domingo às 11:29h (horário de Brasília), se o lançamento acontecer hoje.

Quando estiverem na ISS, a dupla se juntará ao astronauta da NASA Chris Cassidy e aos cosmonautas Anatoly Ivanishin e Ivan Vagner. Nenhuma data foi marcada para o retorno da cápsula Crew Dragon, mas a nave pode ficar ancorada por mais de 100 dias.

The post Como acompanhar a segunda tentativa do lançamento de astronautas para ISS feito pela SpaceX appeared first on Gizmodo Brasil.

Cientistas capturam novas imagens de polvo que vive no local mais profundo já registrado

Posted: 30 May 2020 07:06 AM PDT

Polvo dumbo

Cientistas descobriram uma espécie potencialmente nova do adorável polvo “dumbo”, em um lugar muito singular. A mais de 6.900 metros de profundidade no Oceano Índico, o polvo recém-descoberto foi encontrado em um local mais profundo do que qualquer outro cefalópode já observado.

A descoberta – publicada na revista Marine Biology – sinaliza que ainda há muito a aprender sobre essas criaturas e sobre o mar profundo. É um lembrete de que nem todos os animais das profundezas do mar têm dentes espinhosos e bioluminescência esquisita. Alguns são muito bonitinhos.

O biólogo marinho Alan Jamieson não chegou a ver o polvo quando se lançou nas profundezas do Oceano Índico, em abril de 2019. Sentado em seu submarino, Jamieson passou a maior parte do seu dia explorando o fundo do mar. Lá, ele viu enguias ósseas, alguns camarões, anêmonas do mar e até uma espécie potencialmente nova de caramujo marinho.

Foi só quando ele voltou à superfície e revisou imagens das câmeras que ele percebeu que a tripulação da pesquisa havia capturado imagens dessa criatura das profundezas do mar.

“Primeiro, você tem o pensamento profissional”, disse Jamieson, que conduziu essa pesquisa para o grupo de ciência de águas profundas Armatus Oceanic, ao Gizmodo. “O segundo pensamento é, ‘isso é tão legal’. É uma aventura, é interessante. É bizarro. Você começa a ver todas essas espécies que você somente filmou ou fotografou e, de repente, você está olhando para eles através de uma janela, vivos. É incrível.”

Este foi o segundo polvo “dumbo” que a equipe de cientistas observou durante a viagem. A outra observação aconteceu a 5.760 metros debaixo d’água. Esse gênero de cefalópodes possuem barbatanas acima dos olhos que se parecem com orelhas.

Originalmente, a profundidade máxima que os pesquisadores observavam essa espécie foi a 5.145 metros de profundidade, em uma expedição realizada há 50 anos na costa de Barbados.

Como os pesquisadores testemunharam esses polvos em níveis ainda mais profundos e no Oceano Índico, a aposta de Jamieson é que essa seja uma espécie totalmente nova. Isso não pode ser confirmado, porém, sem a coleta do espécime para análise posterior, o que a equipe não estava equipada para fazer naquele momento.

“Você pode vê-los e trazê-los para a superfície mortos”, disse Jamieson. “Não dá para se deparar com um destes sem que alguém morra [o polvo ou o humano]”.

Outras expedições já registraram polvos deste gênero em outras partes do oceano. Pesquisadores capturaram imagens de alta qualidade dessas coisas fofas, ao fazer uma varredura nas profundezas da Baía de Monterey. Se você quer encher seu coração com fofura, veja como são esses polvos recém-nascidos. Sim, os polvos “dumbo” bebês são ainda melhores que os adultos.

A descoberta de um polvo dumbo nessas profundidades é surpreendente e expande a gama potencial de cefalópodes para 99% do fundo do mar. Mas a fauna marinha como um todo está enfrentando uma crise ecológica. Nem mesmo as profundezas de nossos oceanos estão a salvo dos seres humanos.

Polvo dumbo
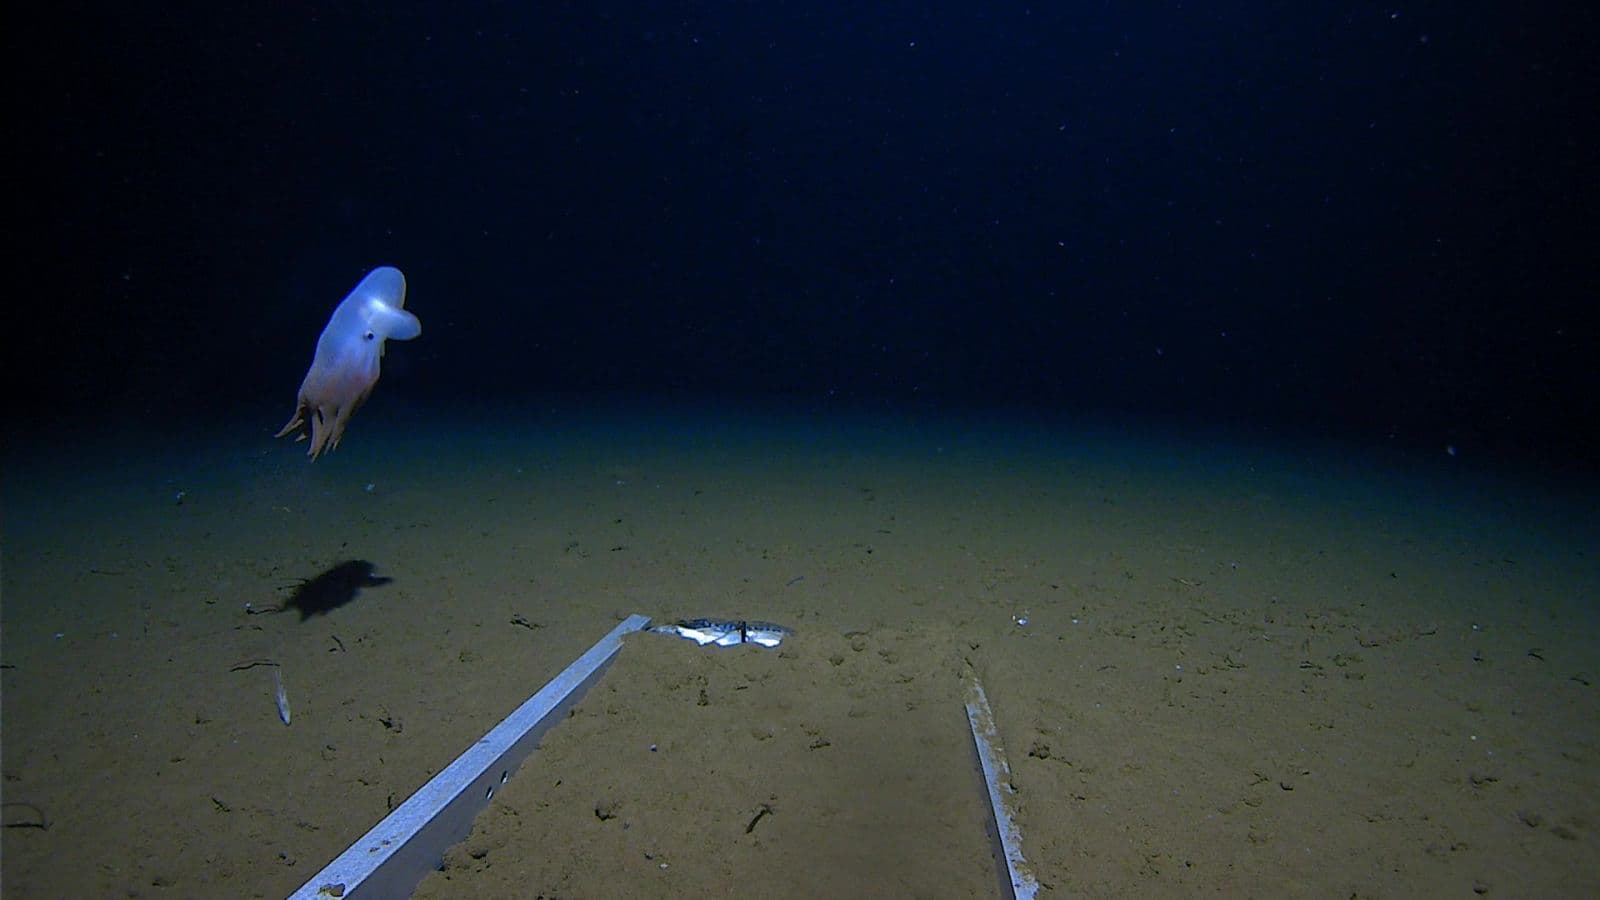
Crédito: Atlantic Productions for Discovery Channel

A poluição de plástico está em todos os lugares, incluindo as profundezas dos mares. Jamieson imagina que os polvos que eles viram já têm quantidades mensuráveis de poluição em seus corpos – e o mesmo deve acontecer com outras criaturas das profundezas do mar.

É difícil saber o quão resistentes os animais de águas profundas são às pressões que seus ecossistemas estão enfrentando devido às mudanças climáticas também. Pode ser que os polvos “dumbo” mal estejam conseguindo se sustentar neste ambiente, disse Jamieson, e quaisquer mudanças podem ser catastróficas.

No entanto, os cientistas ainda não têm certeza de nada. Ainda estão constantemente aprendendo sobre aquilo que está “escondido” em nossos oceanos. O medo é que a destruição humana chegue até eles antes da descoberta científica.

“Estamos poluindo habitat dos animais que ainda nem sequer encontramos”, disse ele.

The post Cientistas capturam novas imagens de polvo que vive no local mais profundo já registrado appeared first on Gizmodo Brasil.

Dicas de como fazer!

Dicas de como fazer!


Watch NASA astronauts fly SpaceX’s Crew Dragon using touchscreens

Posted: 30 May 2020 03:29 PM PDT

Nearly two hours after NASA astronauts Bob Behnken and Doug Hurley became the first astronauts launched to space on a privately-owned rocket, they also became the first to pilot a spaceship using only touchscreen controls.

SpaceX's Crew Dragon eschews the famous maze of manual controls and switches found on retired spacecraft like the Space Shuttle or the Apollo command modules. Instead, Crew Dragon pilots have just three large touchscreen panels in front of them and a few spare buttons below. So during the few times that they have to manually control the spacecraft, they do so using a video game-style interface on those screens.

Behnken and Hurley got to take that interface for a brief test ride Saturday afternoon when SpaceX had them...

Continue reading…

SpaceX successfully launches first crew to orbit, ushering in new era of spaceflight

Posted: 30 May 2020 02:30 PM PDT

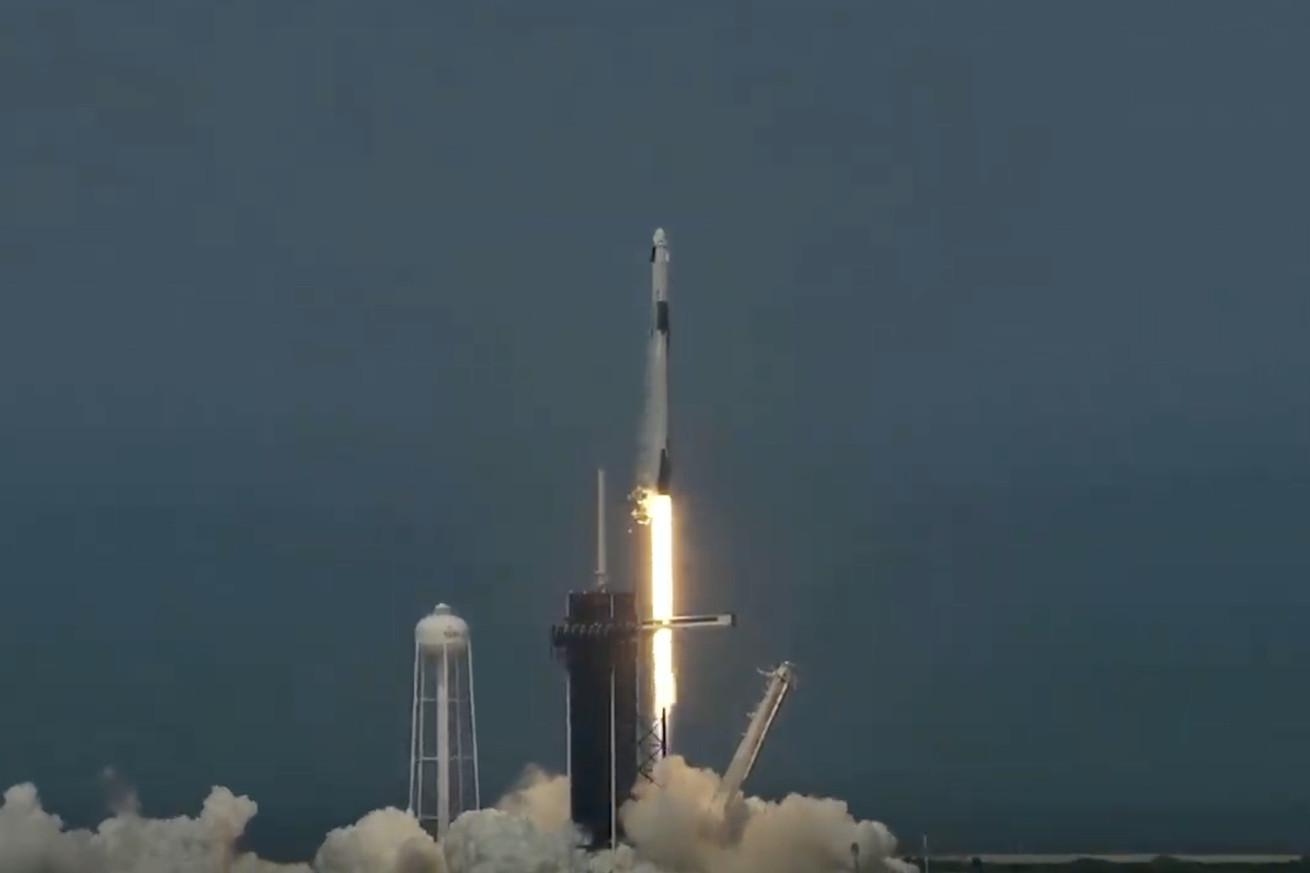
Image: SpaceX / NASA

After nearly two decades of effort, Elon Musk's aerospace company, SpaceX, successfully launched its first two people into orbit, ushering in a new age of human spaceflight in the United States. The flight marked the first time astronauts have launched into orbit from American soil in nearly a decade, and SpaceX is now the first company to send passengers to orbit on a privately made vehicle.

The two astronauts — veteran NASA fliers Bob Behnken and Doug Hurley — rode into space inside SpaceX's new automated spacecraft called the Crew Dragon, a capsule designed to take people to and from the International Space Station. Strapped inside the sleek, gumdrop-shaped capsule, the duo lifted off on top of SpaceX's Falcon 9 rocket from NASA's...

Continue reading…

Meet the cute stuffed dinosaur that hitched a ride on SpaceX’s historic launch

Posted: 30 May 2020 12:44 PM PDT

Astronauts Bob Behnken and Doug Hurley had some company on their historic flight to space today: a stuffed dinosaur tucked into one of the seats on SpaceX's Crew Dragon.

Behnken and Hurley each have a son, and both boys are dinosaur enthusiasts. Before the flight, the boys gathered all their dinosaur toys together, and Tremor, a sparkly apatosaurus was selected to accompany Behnken and Hurley to space. "That was a super cool thing for us to get a chance to do for both of our sons who I hope are super excited to see their toys floating around with us on board," Behnken said during an tour of the capsule in orbit. "I'm sure they would rather be here, given the opportunity, but hopefully they're proud of this as well."

The toy was...

Continue reading…

Microsoft lays off journalists to replace them with AI

Posted: 30 May 2020 08:27 AM PDT

Illustration by Alex Castro / The Verge

Microsoft is laying off dozens of journalists and editorial workers at its Microsoft News and MSN organizations. The layoffs are part of a bigger push by Microsoft to rely on artificial intelligence to pick news and content that's presented on MSN.com, inside Microsoft's Edge browser, and in the company's various Microsoft News apps. Many of the affected workers are part of Microsoft's SANE (search, ads, News, Edge) division, and are contracted as human editors to help pick stories.

"Like all companies, we evaluate our business on a regular basis," says a Microsoft spokesperson in a statement. "This can result in increased investment in some places and, from time to time, re-deployment in others. These decisions are not the result of the...

Continue reading…

The Air Force weather team that keeps canceling your rocket launches

Posted: 30 May 2020 07:54 AM PDT

Bad weather at Cape Canaveral forced SpaceX to postpone its first launch attempt on Wednesday, May 27th. | Photo by Joel Kowsky / NASA

With less than 20 minutes to go before SpaceX's first crewed flight, weather conditions remained miserable, forcing meteorologists at the Air Force's 45th Weather Squadron to deliver bad news to NASA and SpaceX.

"It definitely hurts, especially when we have those hard requirements that when something hits, there's nothing we can do about it," Capt. Jason Fontenot, the space lift weather operations flight commander at the 45th Weather Squadron, said during a press call. "And we just kind of have to pass on the information, saying, 'Even though we're not at the launch window yet, this is very unlikely that we will see this take off today.'"

Military personnel who work at the Squadron in Cape Canaveral, Florida are used to being the ones...

Continue reading…

How to watch the SpaceX Crew Dragon mission

Posted: 30 May 2020 07:01 AM PDT

The Falcon 9 rocket set to carry SpaceX's Crew Dragon to the ISS. | SpaceX

On Saturday, May 30th, SpaceX's Crew Dragon is set to become the first private spacecraft to carry humans into orbit. The launch, scheduled for 3:22PM ET, will also mark the first time in nearly a decade that NASA astronauts have launched into orbit from Cape Canaveral, Florida.

For NASA astronauts Bob Behnken and Doug Hurley, this will be their second attempt at this historic launch. The first launch attempt, on Wednesday, May 27th, was scrubbed due to poor weather conditions less than 17 minutes before launch. They'll get another chance today. If today's launch is delayed for any reason, the next launch attempt will be on Sunday, May 31st, at 3PM ET.

NASA plans to cover today's event live, starting at around 11AM ET. If all goes...

Continue reading…

The Verge’s favorite hobbies to do while stuck at home

Posted: 30 May 2020 07:00 AM PDT

Putting things in jars is a surprisingly therapeutic activity. | Photo by William Poor / The Verge

If you're anything like us, over the past couple of months you've probably finished every "must watch" TV series on Netflix, cleaned your apartment from top to bottom, and completed every video game in your backlog. We get it: social distancing can get pretty boring.

So if you're finding yourself with a lot of time to kill, why not spend it on learning something completely new? With some basic supplies and online resources, it's possible to learn a lot of cool and sometimes downright useful skills, like knitting, calligraphy, or even taking care of a bicycle.

We're a tech site (obviously) so we're not claiming to be experts in all of the hobbies we're recommending below. But what we are good at is locating a lot of very specific and...

Continue reading…

SpaceX Crew Dragon launch live blog

Posted: 30 May 2020 07:00 AM PDT

Follow along as the astronauts suit up and board the Crew Dragon

Continue reading…

Waymo’s robot minivans are ready to roll in the Bay Area for the first time since COVID-19 outbreak

Posted: 30 May 2020 07:00 AM PDT

Self-propelled car from Google sister company Waymo Photo by Andrej Sokolow/picture alliance via Getty Images

Waymo's self-driving cars are returning to Bay Area roads for the first time since the company halted its public testing in early March because of the coronavirus outbreak. The Alphabet-owned company plans to return its fleet of autonomous minivans to service starting June 8th, according to an email obtained by The Verge.

Waymo's self-driving cars will be put to use delivering packages for two Bay Area non-profits: illustrator Wendy McNaughton's #DrawTogether, which provides art kits to Bay Area kids; and Lighthouse for the Blind and Visually Impaired.

The company is the latest autonomous vehicle operator to discover that doing deliveries allows it to sidestep restrictions that would otherwise require them to keep their autonomous...

Continue reading…

Zoom paid accounts reportedly will get strong encryption for calls

Posted: 30 May 2020 06:30 AM PDT

Zoom will add stronger encryption to its paid customers' video calls, but isn't planning to offer the enhanced security to all accounts, Reuters reported. A security consultant with the company told Reuters that it still wasn't clear whether some accounts, such as nonprofit users, might qualify for the more secure calls.

"Zoom's approach to end-to-end encryption is very much a work in progress - everything from our draft cryptographic design, which was just published last week, to our continued discussions around which customers it would apply to," a company spokesperson said in an email to The Verge.

The videoconferencing platform has boomed in popularity during the coronavirus pandemic, but has been plagued by myriad security issues....

Continue reading…


How to Prune Begonias

Posted: 30 May 2020 01:00 AM PDT

Begonias make a great addition to the shaded areas of your garden or your house, but they need to be pruned to control their spread, keep their foliage thick and avoid an overgrown look. Common varieties of begonia include tuberous, cane, semper florens, rex and winter-flowering begonias. You can grow many of the varieties outdoors in USDA hardiness zones 9 and 10, but you can grow them as annuals or indoors in colder climates. Be sure to time your pruning correctly, then you can prune your plant to shape it and help it flourish.

[Edit]Steps

[Edit]Timing Your Pruning

  1. Pinch off new growth a few weeks after planting. Use your finger and thumb to remove the ends of small stems that branch off the main stems. This will encourage several new stems to sprout in place of each stem you pinch.[1]
    Prune Begonias Step 1.jpg
    • This step is particularly important if you have cane begonias, such as Angel Wings. Pinch off new stems when the newly-planted cane begonia is about tall. This will make the plant produce two branching stems, rather than a single stem growing straight up.
    • You can also pinch off the young flower buds of tuberous begonias. This will make the plant produce additional blooms.
  2. Thin out thick foliage when the begonia is fully grown. If your begonia gets bushy and overgrown, you can cut off up to a third of its stems. This will make the plant look less rambling and more aesthetically pleasing.[2]
    Prune Begonias Step 2.jpg
  3. Deadhead the begonias at the end of the blooming season. When the flowers and buds of a begonia go brown and die, you should remove them. You can use your fingers, pruning shears or scissors. This process will help the plant conserve its energy and produce new flowers and new growth rather than seeds.[3]
    Prune Begonias Step 3.jpg
    • For most begonias, the blooming season is in the spring and summer. Winter-flowering begonias bloom from late autumn to mid-spring.
  4. Cut back begonias in autumn. Once the begonias have finished flowering for the year, you can use pruning shears or sharp scissors to cut the main stem of the begonia back to a length of . This will help conserve the plant's energy over the winter so that it grows back the next year.[4]
    Prune Begonias Step 4.jpg
    • If you're growing your begonias as a perennial, they need more pruning. You should cut them back up to 1/3 of the plant after flowering. Throughout the year, prune your begonias to shape their growth.
    • If you have winter-flowering begonias, cut them back in the spring after they have finished flowering.

[Edit]Keeping Your Begonias in Shape

  1. Inspect your plants for damaged or diseased areas. You should regularly check your begonia for leaves and stems which are discoloured.[5]
    Prune Begonias Step 5.jpg
  2. Remove dead or diseased parts with shears or scissors. Cut off the discoloured stem or leaf just below the start of the brown area, but try to leave as much of the healthy (green) area of the plant intact as possible. You should cut the stem off at about a 45-degree angle. If there is a large brown area, you can cut off the entire stem. If you do so, be careful not to damage the main stem.[6]
    Prune Begonias Step 6.jpg
    • Make sure to remove the dead leaves and stems from the floor immediately as they may spread disease into the healthy plant.
  3. Pinch off the tips of the largest stems. In the growing season, use your finger and thumb to pick off the tips of the largest stems. This will help the plant's appearance and other stems to grow more uniformly.
    Prune Begonias Step 7.jpg
    • Don't cut the tips off all of the stems as this may damage the plant. Only cut off the tops of the few tallest stems.
  4. Pinch off the last two sets of leaves on a tall branch. This will encourage a growth spurt from this particular stem.
    Prune Begonias Step 8.jpg

[Edit]Pruning Intensively

  1. Trim off leggy stems with shears or scissors. Leggy stems are parts of the plant which grow outwards above your desired shape. They can detract from your plant's aesthetic appeal and drain energy from other parts of the plant.[7]
    Prune Begonias Step 9.jpg
    • This step is particularly important if you have perennial begonias, which come back year after year.
  2. Cut back taller begonias. Types such as the cane begonia should be cut back at the end of the growing season (usually in autumn). Use pruning shears or sharp scissors to cut the main stem of the begonia back to a length of .[8]
    Prune Begonias Step 10.jpg
  3. Store tuberous begonias over the winter. If you have tuberous begonias (such as the Go Go Yellow variety) and are growing them outside, dig up the bulbs after you have cut them back. You can then store the bulbs over the winter in a bag of peat moss, and replant them in the spring.[9]
    Prune Begonias Step 11.jpg
    • If the tuberous begonia is growing in a pot, tip the pot over on its side and move it to a sheltered area. This will protect the begonia during the winter.
  4. Re-root healthy cuttings. If you have stems of the begonia which are still green, you can keep them so that you can use them to grow other plants. Place the cutting in a glass or vase of room-temperature water. After about a week, roots will start to appear and the cutting will be ready to re-plant.[10]
    Prune Begonias Step 12.jpg

[Edit]Tips

  • Clean your scissors or pruning shears by soaking them in a diluted bleach and water solution. You can also use rubbing alcohol. In either case, make sure to rinse them off thoroughly in water and dry the tools with a hand towel before pruning your plant.[11]
  • If a lot of your begonias' leaves go brown, it may be a sign that you need to thin out the foliage to allow the plant to grow properly.
  • If taller begonias start to grow lanky stems or can't support the weight of the foliage, it's probably time to prune some of the stems.

[Edit]Warnings

  • Certain types of cane begonia (e.g. Angel Wing) are poisonous and should be kept away from pets and children.
  • Begonia stems can be brittle and easily damaged. You should be careful not to damage the main stem of the plant while pruning it.
  • Don't prune more than 1/3 of a begonia at any 1 time as this stresses the plant, which may kill it.

[Edit]References

[Edit]Quick Summary

How to Fill Pill Capsules

Posted: 29 May 2020 05:00 PM PDT

Filling your own pill capsules at home can be a great way to incorporate healthy supplements into your diet without spending a lot of money. You'll need to get supplies, including the type and size of capsule you want and herbal fillings to put in them. Filling your capsules by hand is more time-consuming, but less expensive. If you have a bit more money to spend, you can purchase a capsule-filling machine to make tons of capsules quickly.

[Edit]Steps

[Edit]Choosing Your Supplies

  1. Select vegetarian capsules if you have dietary restrictions. Vegetarian capsules are made from poplar trees. They're also a good option if you have other dietary restrictions. Vegetarian capsules are kosher, halal, and gluten-free.[1]
    Fill Pill Capsules Step 1.jpg
    • You can find vegetarian capsules at your local health food store or online.
  2. Use gelatin capsules if you don't have dietary restrictions. Gelatin capsules are made from beef gelatin. You won't taste any beef flavor, though! They tend to be slightly cheaper than vegetarian capsules.[2]
    Fill Pill Capsules Step 2.jpg
    • Check a health food store for gelatin capsules, or buy them online.
  3. Choose size 0 capsules for a standard dose. Fillable capsules come in a few different sizes, but the most common is size 0, which will hold roughly 500 mg of filler.[3]
    Fill Pill Capsules Step 3.jpg
    • The density and size of the powder may affect how much filler you can fit in a capsule.
  4. Pick size 1 capsules if you want a smaller pill. Size 1 capsules are slightly smaller than the standard size 0. That makes them easier to swallow.[4]
    Fill Pill Capsules Step 4.jpg
    • Size 1 capsules hold about 20% less than size 0 capsules, so keep that in mind if you're looking at going smaller.
  5. Ask your healthcare provider to recommend an herbal filler. Always speak to your healthcare provider before taking supplements. Depending on the issue you have and the herbs your healthcare provider recommends, your supplements can help boost your immune system, decrease inflammation, or help with digestion.
    Fill Pill Capsules Step 5.jpg
    • Cayenne is an antioxidant. While it is still being studied, it may be able to help relieve nausea and treat bacterial infections. Putting it in a capsule lets you access its health benefits without potentially burning your mouth.[5]
    • Ginger may help you fight common illnesses, like colds, sinus congestions, and headaches. It can also help settle indigestion.[6]
    • Oil of oregano (which actually comes from a relative of the marjoram plant) might be able to help relieve pain.[7]
    • Turmeric may lower your blood pressure and cholesterol.[8]

[Edit]Filling the Capsules by Hand

  1. Place your filler in a bowl. Pour your filler into a bowl. If you're using a mixture of fillers, pour all of them together and then mix them well. It's okay to have too much filler for the number of capsules you're filling. Just put the leftover filler into a resealable plastic bag and store it in a cool, dark place.
    Fill Pill Capsules Step 6.jpg
  2. Pull apart the capsules and set the tops aside. Your capsules will come assembled. To take them apart, hold the bottom of the capsule with one hand, and gently pull the top off with the other. If you're having trouble pulling it straight off, twist the capsule top back and forth until it comes free. Put the top aside.[9]
    Fill Pill Capsules Step 7.jpg
    • The tops of the capsules will be much shorter and wider than the bottoms. This lets the tops slide over the bottoms of the capsules when they're put back together.
  3. Scoop up your herbal mix with the bottom of the capsule. Using the bottom of the capsule to scoop up your herbal mixture is the easiest way to fill the capsules and it prevents too much mess. Fill the bottom of the capsule completely.[10]
    Fill Pill Capsules Step 8.jpg
    • Before you fill your capsules, make sure your hands are very clean. You can also wear protective gloves.
  4. Put the top half of the capsule over the bottom and press down. Once you've got the bottom of the capsule filled, gently replace the top of the capsule. Hold the bottom of the capsule gently in one hand, then use the other to press the top of the capsule down.[11]
    Fill Pill Capsules Step 9.jpg
  5. Store the capsules in a cool, dark place. As you finish each capsule, place it in a resealable bag or a jar with a lid. Place the bag or jar in a cool, dark place for storage.
    Fill Pill Capsules Step 10.jpg
    • Make enough capsules for 1 or 2 months at a time. If you make more than that, they may expire before you can take them.
    • If you live in a humid place, put silica gel packets in the jar with your pills. You can buy packets online or save ones packaged in shoes, medications, or other products.

[Edit]Using a Capsule Filling Machine

  1. Select your capsule-filling machine based on capsule size. Each capsule filling machine works with only one size capsule. When you're selecting your machine, make sure you pick one that can accommodate the capsule size you chose.[12]
    Fill Pill Capsules Step 11.jpg
    • You can find capsule-filling machines in most health food stores and online. They cost around $20.
  2. Place the base of the machine on its stand. Place the base of your machine on the included stand to keep it secure while you're filling the capsules and fusing them together.[13]
    Fill Pill Capsules Step 12.jpg
    • The capsule-filling machine will also come with a top where you load the tops of the capsules and a stand.
  3. Load the bottom of the capsules into the base of the machine. Pull your capsules apart. Place 1 capsule bottom into each indentation in the bottom of the machine. Don't load more than 1 capsule bottom in each opening.[14]
    Fill Pill Capsules Step 13.jpg
    • The bottom of the capsule is much longer than the top. This lets the top slide over the bottom when they're sealed together.
  4. Pour your filler over the holes in the base of the machine. Put the filler in a measuring cup, then pour the filler over the holes where your capsule bottoms are loaded.[15]
    Fill Pill Capsules Step 14.jpg
  5. Spread the filler into each capsule bottom. Capsule-filling machines usually come with plastic cards that you can use to fill your capsules. Once you have your filler poured on into the holes of the machine base, you'll need to even out the distribution. Use the card to sweep the powder over the openings so the powder is distributed evenly. This will fill your capsules.[16]
    Fill Pill Capsules Step 15.jpg
    • If your machine didn't come with a card, you can use any piece of clean, hard plastic, like a credit card, to even out the powder.
  6. Use the included tamper to compact your fillers if necessary. If you weren't able to fill the capsules completely on the first try, use the tamper to compress the filler and make more room. Line up the prongs of the tamper with the openings where the capsule bottoms are loaded, and then gently press down so the filler in each capsule bottom is compressed.[17]
    Fill Pill Capsules Step 16.jpg
    • The tamper looks like a flat piece of plastic, with prongs sticking out of on 1 side.
  7. Repeat the filling process if you tamped the filler down. Pour more filler over the holes holding the capsule bottoms, then use the enclosed card to spread it evenly into the holes.[18]
    Fill Pill Capsules Step 17.jpg
  8. Load the top of the capsules into the top of the machine. The top of the machine will have openings where you can place the tops of the capsules. Press down gently as you place 1 capsule top in each opening. The tops should be secure in the openings even if you turn the top of the machine upside down.[19]
    Fill Pill Capsules Step 18.jpg
  9. Line up the top of the machine with the bottom and press down. Remove the base of the machine from the stand. Then gently flip the top of the machine over so the openings in the top and bottom are lined up with each other. Press down on the top of the machine until it stops compressing. At this point, the pills have been fully joined.[20]
    Fill Pill Capsules Step 19.jpg
  10. Remove the top of the machine and pop out the finished capsules. When you remove the top of the machine from the base, you'll see the bottom of the capsules poking out of the top of the machine. Push down on the top of the machine top to pop the capsules out.[21]
    Fill Pill Capsules Step 20.jpg

[Edit]Tips

  • If you're concerned about getting the exact same amount of filler in each capsule, it's better to use a capsule-filling machine instead of filling your capsules by hand.

[Edit]Warnings

  • Do not crush prescription medication and mix it with other fillers in homemade capsules. Prescription medications can interact with one another and herbal supplements in dangerous ways.

[Edit]References

[Edit]Quick Summary

How to Make Orange Juice

Posted: 29 May 2020 09:00 AM PDT

There is nothing as satisfying as a glass of freshly squeezed orange juice. It may take a couple minutes longer than you expect. However, the taste is worth the effort and the wait. Try it out: Make some and see if you want to go back to drinking bottled juice again!

[Edit]Steps

[Edit]Squeezing Orange Juice by Hand

  1. Soften the orange. Tightly squeeze or roll the oranges firmly with the palm of your hand across the counter or table to soften them up.[1]
    Make Orange Juice Step 1 Version 5.jpg
  2. Cut the orange. Slice the orange in half and remove the seeds. If you want to go seedless, use navel oranges.

  3. Juice the orange. Grip the one of the orange halves tightly and squeeze it by hand, using a plain juicer to coax all the juice out.

  4. Add pulp. Scrape the orange with a spoon and add the pulp directly to the juice if you use a hand juicer. If you prefer clear juice, pour the juice through a strainer before drinking.Add some pinch of black salt or sugar for more flavor. Some oranges are already sweet.[2]

  5. Drink up! Enjoy a crisp, cold glass of freshly squeezed, unpasteurized orange juice, the way it was intended to be!
    Make Orange Juice Step 5 Version 6.jpg

[Edit]Squeezing Orange Juice with an Electric Juicer

  1. Prepare the oranges. Peel and quarter the oranges in sections. Smaller oranges such as mandarins may only need to be broken in half.[3]

  2. Process the oranges through the feed tube.
    Make Orange Juice Step 7 Version 2.jpg
    • Make sure you have something to catch all that delicious juice coming out the other end!
    • Note that some juicers have the ability to adjust how much pulp is extracted with the juice. Check out How to Find a Good Juicer for more information.

[Edit]Squeezing Orange Juice with a Blender or Food Processor

  1. Prepare your oranges for blending. Peel the oranges, then cut or tear them into 1-inch chunks. If the oranges are seeded, be sure to remove those as well.[4]

  2. Pulse a few times to break up the oranges. Then process continuously until the oranges are pureed.

  3. Taste test the juice. If it is too dry, add some water. If not sweet enough, add sweetener to taste.

  4. Run the blender again. Run until it is liquified.

  5. Let sit for a few minutes to settle, then serve!

[Edit]Tips

  • Try different varieties of oranges, to see which you like best for juices. Valencia oranges have seeds, but are juicy; navels are easy to get at, are large, and have no seeds; Cara Cara's are sweet, and have a "tangy cranberry-like zing," according to Sunkist.[5]
  • Make sure that the oranges you use are fresh. It increases the orange juice flavor.
  • For a different take on the standard orange juice, use Moro oranges, also known as "blood oranges." Their bold color and flavor will go well with a spicy omelette.

[Edit]Warnings

  • Florida oranges are far juicier than California oranges. You can recognize Florida oranges when you cut them because the skin is much thinner.[6]

[Edit]Things You'll Need

  • Knife
  • Juicer
  • Glass(es)
  • Spoon

[Edit]Related wikiHows

[Edit]References

[Edit]Quick Summary